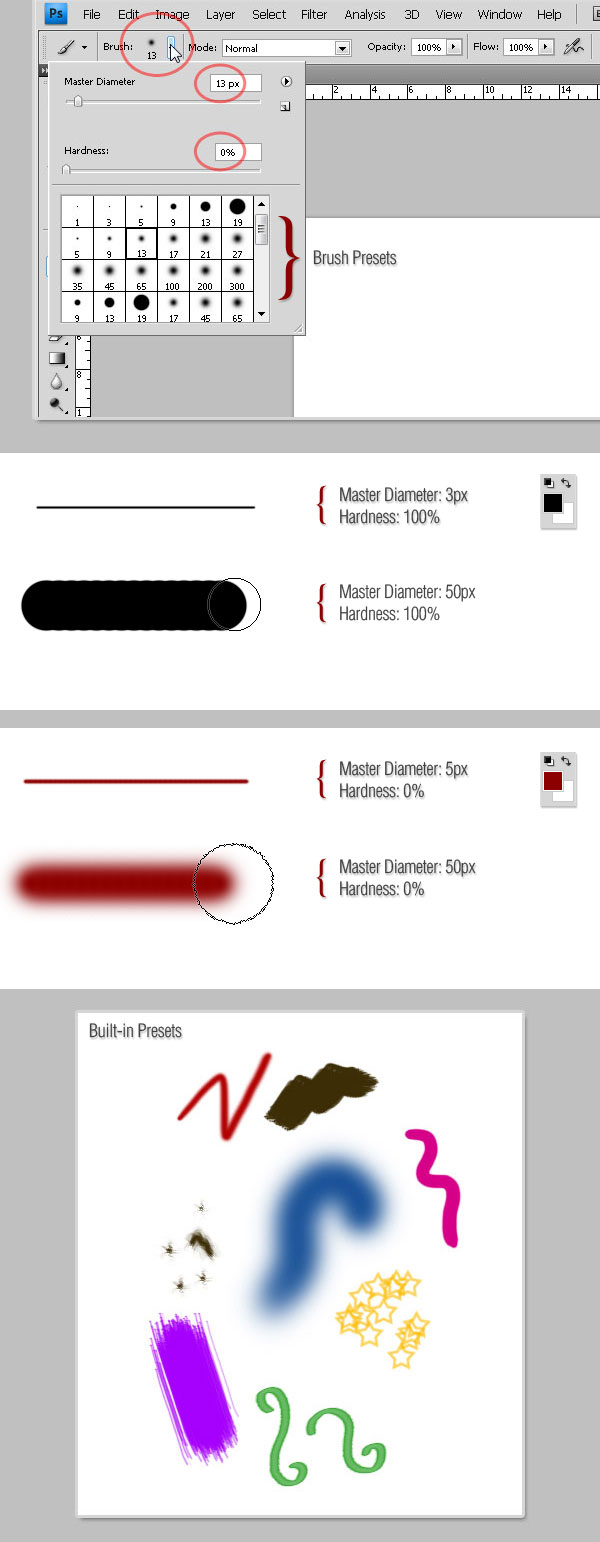
Photoshop includes several built-in presets, that are in fact pre-made brushes ready to use.
Part 1 - Basics
Brush Tip
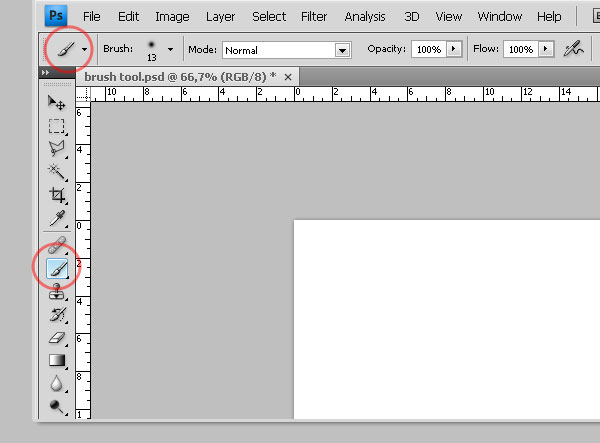
This is the most basic option for any Photoshop User, the Brush Tip settings allow you to modify the way to add colors on a Photoshop document using the Brush Tool. By clicking on the Brush Preset Picker in the default Options Panel you will see several built-in presets. On many of the presets you can easily adjust two very important values:
- Master Diameter increases or decreases the size of the brush tip. The default shortcuts to increase or decrease are the Left Bracket key and the Right Bracket key respectively. Photoshop CS4 enables a dynamic way of doing it by Ctrl + Option (Mac) + Click or Alt + Right Click (Win) and Drag.
- Hardness increases or decreases the brush tip's border strength, 0% means a really soft border (color fades out) and 100% a precise border. The shortcuts to increase or decrease hardness percentage are the Left Bracket key and the Right Bracket key respectively. In CS4 you can dynamically modify this value by Ctrl + Option + Shift (Mac) + Click or Alt + Shift + Right Click (Win) and Drag.
You can even combine Foreground and Background colors (we will see this feature forward). Most of the time the color that is applied by using the brush tip is the Foreground Color.
Preset Picker Contextual Menu
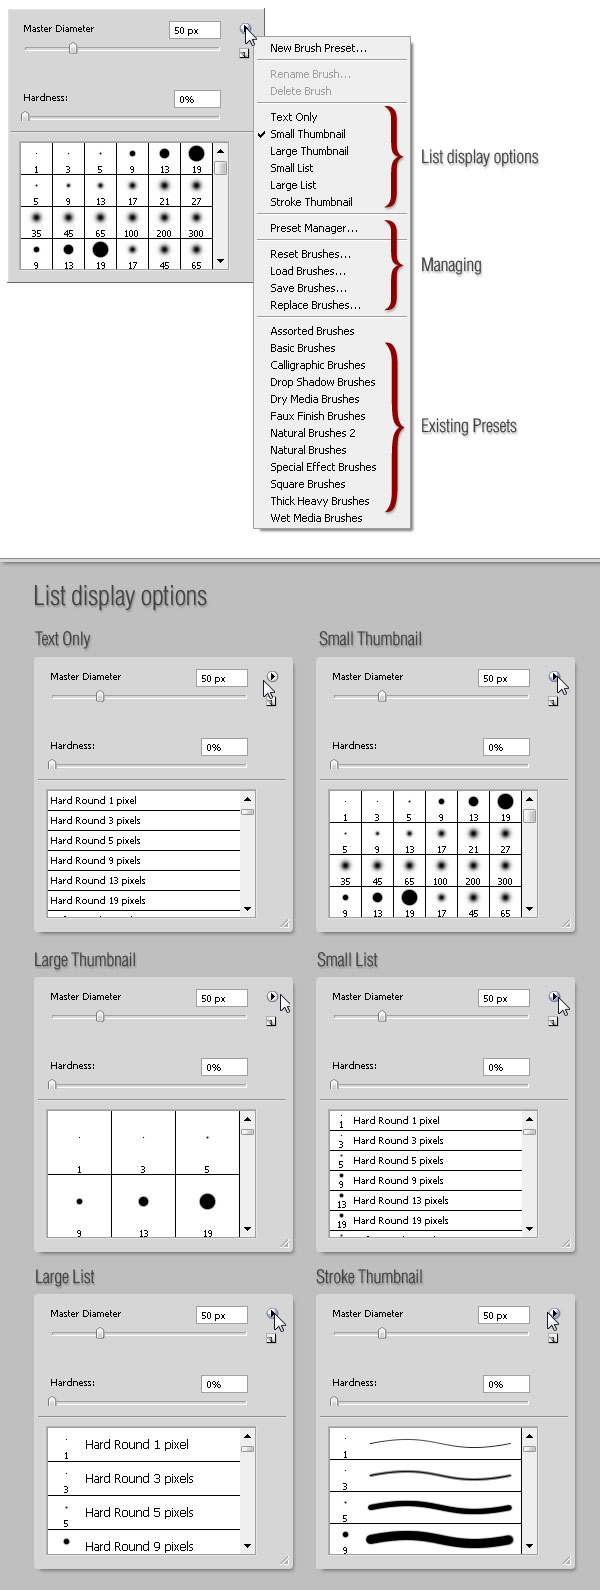
There are many useful tools at the Brush Preset Picker menu including Create a New Preset, Edit it, and Delete. Then there are some options to display the list of brushes in the Preset Picker panel, below there are several examples of this. Besides, you can easily Manage the Brush list by loading, saving and replacing brushes in the list, or Append one of the existing Brush collections. We will see more about preset creation shortly.
Brush Blending Modes
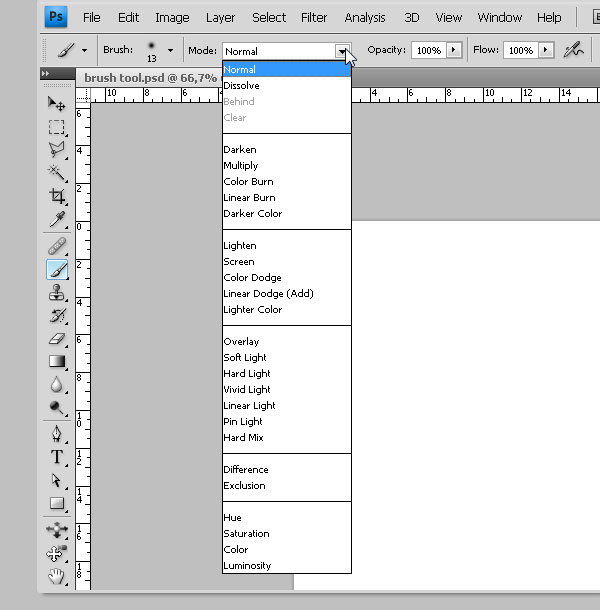
Each time you paint something using the Brush Tool you can chose a Blending Mode for the stroke. A Blending Mode is a way to mix the colors with the object(s) behind them using several mathematical formulas working over the RGB values of each pixel. Let's try some of them.
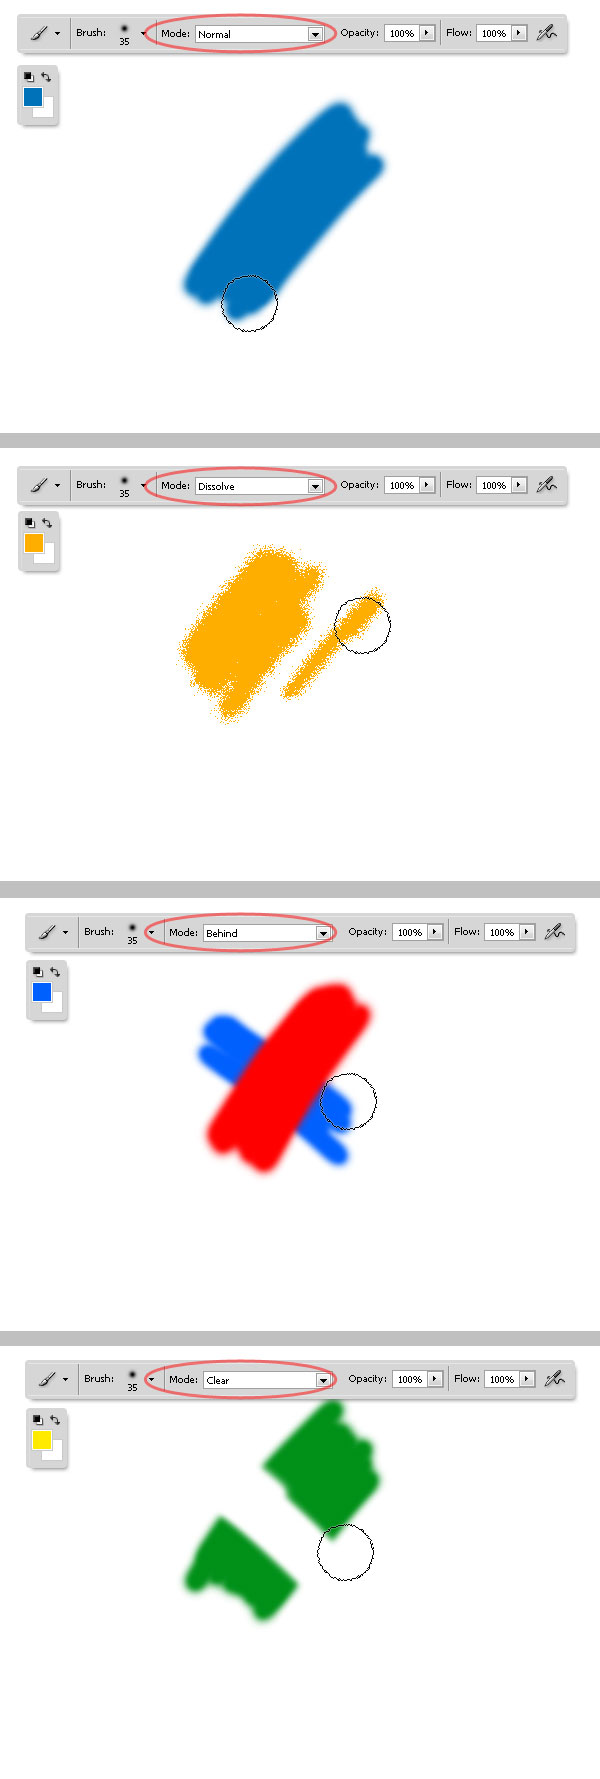
Modes: Normal, Dissolve, Behind and Clear
Let's review some of the basic Blending Modes.
- The first on the list is the Normal Mode, which paints the color as is without applying any transformation to the color pixels.
- The Dissolve Mode adds some noise at the edge of the brush stroke.
- Behind Mode paints behind an existing stroke even if they are both on the same layer.
- By using the Clear Mode you can delete a section of an existing stroke.
More Blending Modes
The Following Blending modes are just the same that can be applied to the Layers, below you can see some examples of blending modes, and some applications. They are fairly useful for adding color to objects (Darken, Multiply, Overlay) or add some lights (Lighten, Color Dodge). You have a lot to experiment with here, no matter how many years you have been using Photoshop, you never stop learning about Blending Modes.

Opacity
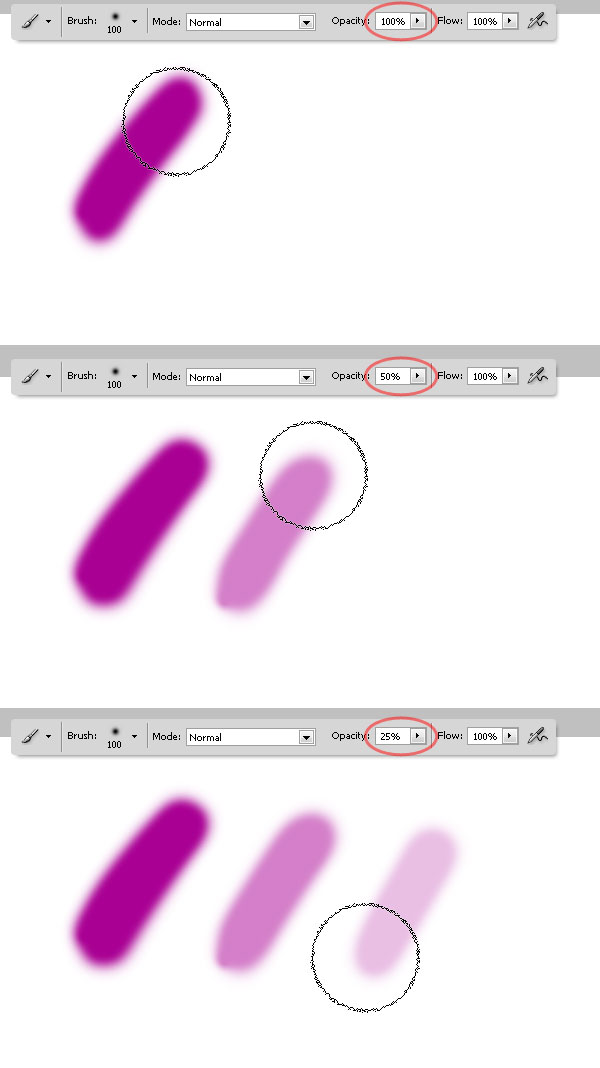
The Opacity Value is a percentage of transparency, 100% means a full color stroke, a small percentage means a more transparent painting.
3. Flow
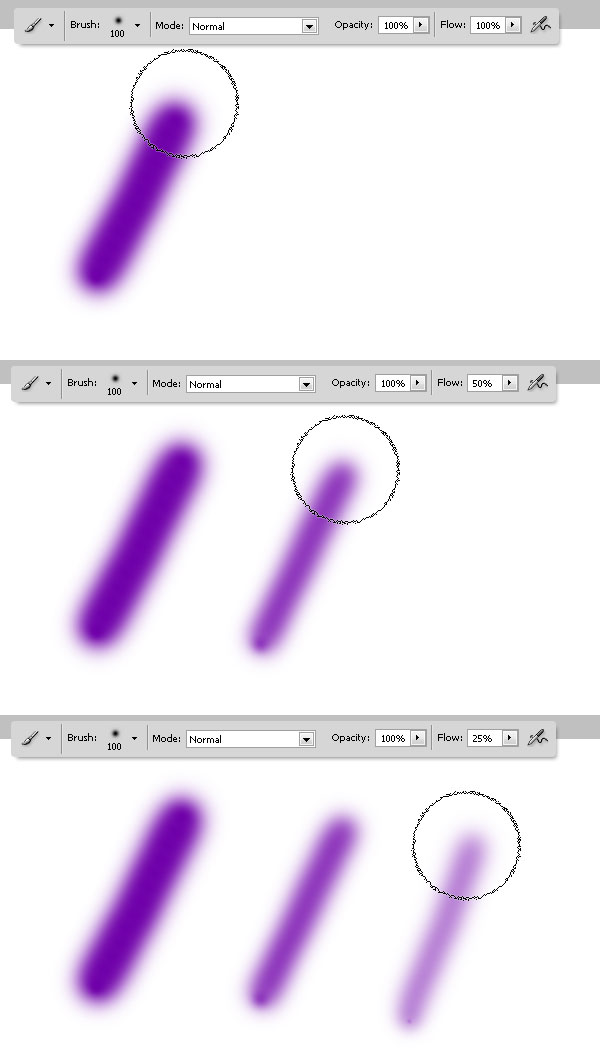
The Flow value is a percentage that sets the rate of color applied. Each time you press the mouse button the amount of color applied is controlled by the Flow percentage, besides it cannot exceed the Opacity percentage unless you click again in the same place.
Brushes Panel
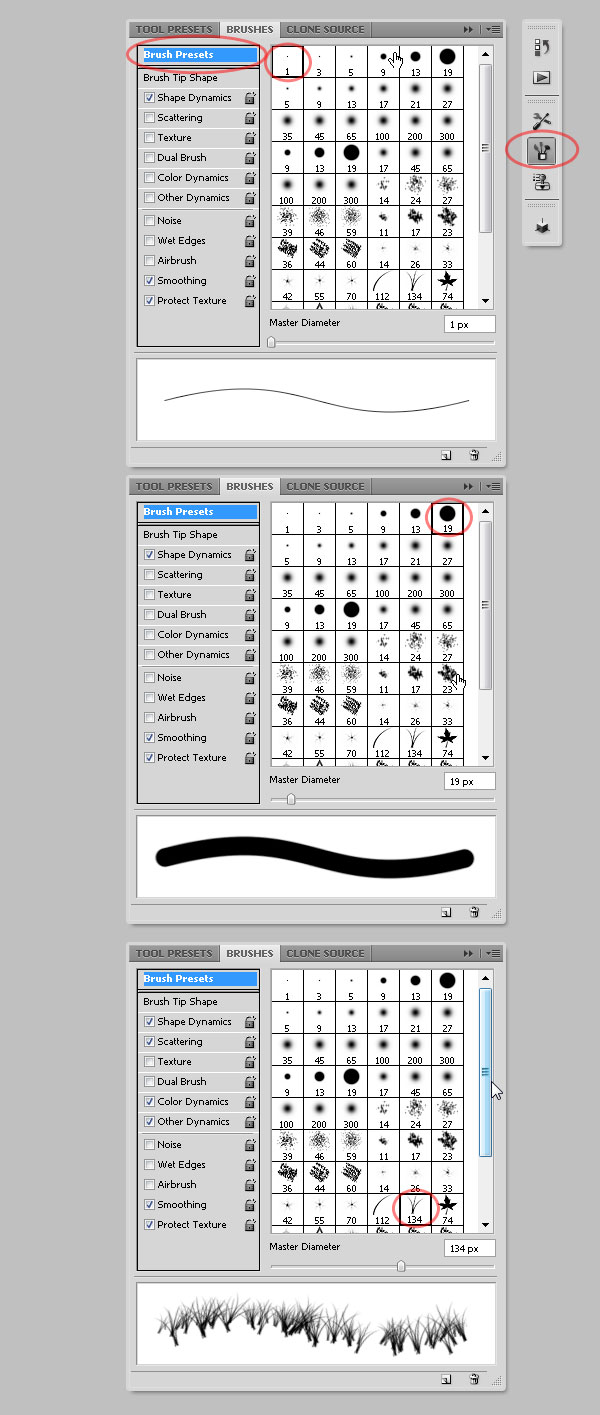
The Brushes Panel is the right place to create, edit, save and load a particular brush behavior or Brush Preset. You can customize several things here like the brush tip shape, scattering, opacity jitter, flow jitter, Background/Foreground jitter, configure controls for each variation and more.
To show the Brushes Panel go to Window > Brushes, or press the F5 key. You need to select the Brush Tool on the Tools Panel to enable the Brush Preset options.
As you can see, as soon as you show the Brushes Panel you can click over the Brush Presets option on the left and then in the main area a list of all the active brushes. Try them before moving forward in this guide, paint some random strokes using different presets and see what happens. Next we'll create a Custom Brush, and apply several variations to it.
Creating a Brush Tip from an Image
One of the most powerful features of Photoshop is the ability to create custom brushes from scratch using any image as a source. This time we'll make a brush using this image of a nice leaf.
Step 1
Open your image in Photoshop, and double-click on the "Background" Layer in the layers palette to make it editable. Then Go to the Channels panel (go to Window > Channel) and duplicate any of them (you can duplicate a channel by dragging the layer over the Create New Channel button at the bottom). I'm choosing the Green this time, then hide the other channels for awhile.
Then, With the "Green copy" channel selected hit Command + I to invert the colors, Then adjust the levels a little bit to make the leaf whiter. Finally, hit Command (Ctrl) + A to select the entire image, hit command (Ctrl) + C to copy the "Green copy" channel to the clipboard and then delete it. Remember to turn on the visibility of the RGB channel before moving forward.

Step 2
Go back to the Layers Panel, select the only layer and go to Layer > Layer Mask > Reveal All. Switch to the Channels panel again and select the Layer Mask channel added at the bottom. There hit Command (Ctrl) + V to paste the clipboard, and that's it. Now go back to the Layers panel to see how it looks.

Step 3
Now add some adjustments to the leaf, go to Window > Adjustments to show the Adjustments panel. First add a Black and White > High Contrast Red Filter, and then a Levels adjustment using the values shown in the image below. Finally, select the three layers, and merge them by pressing Command (Ctrl) + E.
Then using the Transform Controls, resize and rotate the leaf as you wish, the only restriction is that the image cannot exceed the 2500 by 2500 pixels in size. Finally, Command (Ctrl) + Click on the merged Layer miniature to select the leaf contour, and go to Edit > Define Brush Preset, type some name and voilá a brand new brush tip ready to customize.

Step 4
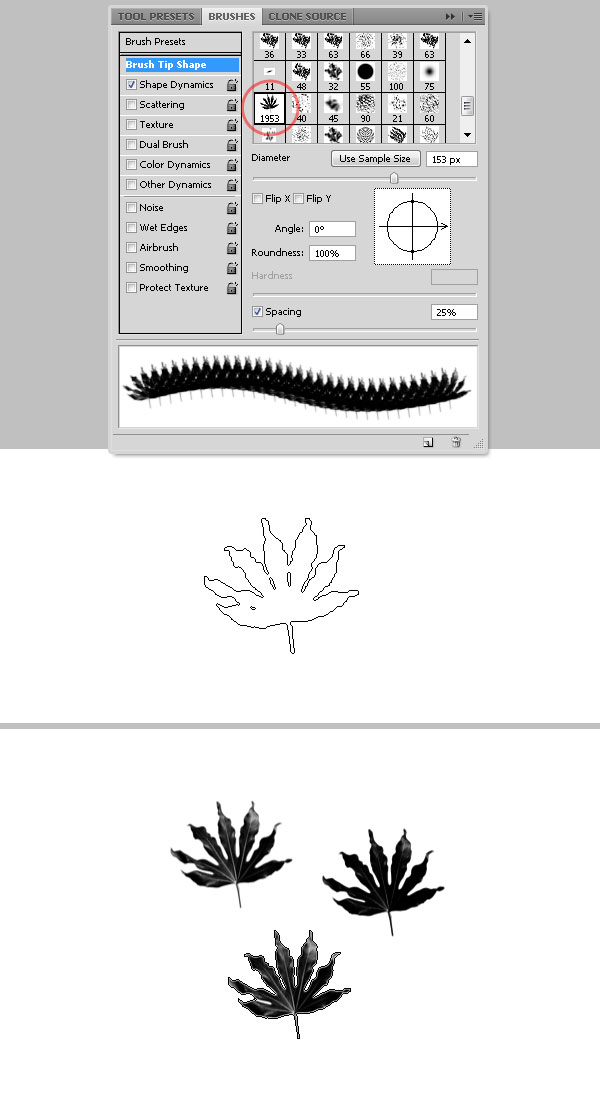
Once you've created the tip shape, you will see it in the Brushes Panel. You can select the brand new brush and paint some spots to see how it actually looks.
Create a Brush Preset
Now we'll review all the possible variations of a brush preset, from the brush tip to color jitters and pressure controls. The first thing that you should do by creating a Brush preset is select a brush tip from the library or, as in this case, start working with a custom brush tip. The Lock icon next to a brush attribute retains the setting even when you change your tip or preset.
Brush Tip Shape
The first thing that you can customize is the brush tip.
- The Diameter value is a pixel measured size of the Brush Tip, cannot be bigger than the tip image.
- The Flip Axis checkboxes flip the tip on its respective axis, X or Y (Horizontally or Vertically) or even both.
- The Angle value rotates the brush by the desired degrees.
- Roundness defines the elliptical roundness of the brush tip where 100% is a perfect circle.
- The Spacing is the percentage of space between images when you draw a stroke on the canvas, using a mouse or a pen tablet. The larger the percentage, the bigger space between color spots.
- Finally, you can edit the Hardness value of the tip. Anyway custom Brushes created from an image cannot modify its Hardness value, but it will work with the default round tip for instance.

Shape Dynamics
Shape dynamics enables several options to handle randomness of Size, Angle, Roundness and Flip Axis values. The larger the percentage, the more random the result. Every Jitter can be controlled using a proper hardware device like a Graphic Tablet.

Control
Many brush behaviors like Jittering and Scattering can be controlled by setting one of the options of the Control drop down. There are five Control options that you can use:
- Off means no control will be applied.
- Fade Control fades the brush stroke from the initial diameter to the minimum value in a custom number of Steps (i.e. 25 steps in the image below).
- Pen Pressure Varies the brush diameter by using the pen pressure values provided by the external device (a graphic tablet). Pen Tilt and Stylus Wheel works the same way but using the hardware's tilt and stylus wheel values.

Scattering
Scattering (1) determines the amount and placement of brush marks in a stroke. The higher the scattering percentage the more distribution of marks. The Both Axes checkbox enables the scattering in both X and Y axis, deselecting this option means the scattering will be perpendicular to the stroke direction.
The Count slider (2) specifies the number of brush marks, a large number means many marks. Count Jitter (3) adds some Randomness to the amount of marks on a stroke. Remember you can apply the Control options for Scatter and Count Jitter as well as in Shape Dynamics.

Color Dynamics
This option controls how the color of paint changes across a stroke. The way it works is pretty simple, it just adds some random color marks in a range between both Background and Foreground colors.
- The Jitter Percentage defines the randomness between the colors. There you can define a Control for the Jitter, Pen pressure, Fade, Pen Tilt or Stylus Wheel.
- The Hue Jitter controls the difference between the Front Color Hue and the Foreground Color Hue, the larger the percentage the bigger the difference.
- Saturation Jitter defines a percentage by which the Saturation of a stroke varies between Foreground and Background colors, a larger percentage means a lot of variation of the Saturation.
- Brightness Jitter is pretty much the same as the previous, but this works over the Brightness value. A higher percentage means a darker color increases the difference between front and back colors.
- Purity increases or decreases the saturation of the color.

Dual Brush
Let's change the brush tip for this one. In the following example I'm creating a peculiar brush (1) for an easy explanation of the Dual Brush. This one combines two tips to create a mixed mark. The second brush texture is applied within the brush stroke of the primary brush, only the areas where both strokes intersect are painted. You can choose a blending mode to combine the primary tip with the second, and all the common brush tips variation shown before.

Texture
Textured brushes use a pattern to make strokes look as if they are painted on a textured surface. To paint with a texture, grab one of the textures from the pop-up panel and set a percentage for the pattern Scale. You can Invert the pattern colors as well. Let's review some variations of the ways to use a texture brush.
If the Texture Each Tip checkbox (1) is selected, then each time you paint a mark a new instance of the texture will be applied (consider a brush stroke as many marks). If this is unchecked the texture will remain flowing through the stroke as a whole.
The Blending Mode option (3) blends the texture with the brush tip color and Depth (4) will increase or decrease the texture's contrast creating a depth sensation.
At last some textures enable the Depth Jitter with a variation between Depth and Minimum Depth percentages using a Control (rarely used, but you can experiment with it).

Other Dynamics
There are two options here. Opacity Jitter adds randomness to each mark's Opacity, and Flow Jitter will vary the Flow of the stroke. You can add a Control for any of them (Pen Pressure, Fade, Pen Tilt or Stylus Wheel).

More Dynamics
There are five more dynamics on the list:
- Noise will add some noise at the borders of the brush mark.
- Wet Edges creates an illusion of watercolor painting, where the borders of the stroke seem darker than the center.
- Airbrush simulates traditional airbrushing, so a long time pressing the click button means a bigger mark. The Airbrush option corresponds to the Airbrush option in the options bar.
- Smoothing, pretty useful wen you're painting in a rush, as it produces smoother curves in brush strokes. Great when you're drawing with a mouse.
- Finally, Protect Texture applies the same pattern and scale to all brush presets that have a texture no matter if they have different settings.

Create a New Preset Brush
Before or after modifying the brush options, you can easily save it by going to the Panel Menu and selecting New Brush Preset or clicking over the New Brush Button at the bottom of the Panel. Type a name for it and that's it!
This Brand new brush will appear now in the Brushes Panel, but if you reset the brushes library (you'll see this next) or if there's a problem with the default Photoshop's Preferences file, your brush will be lost.

Save and Load Brushes Libraries
- In order to keep your very own custom brushes you can save as many brush libraries as you want. Click Save Brushes in the Brushes panel to save the actual set of brushes as an ABR file (you can delete the unnecessary brushes before saving the library by clicking on the Delete icon in the panel).
- To Load a previously saved brush library, click on Load Brushes in the Brushes Panel menu, or double-click on the ABR file itself in your file system. Either way will append the library at the bottom of the brushes list active in Photoshop.
Besides you can click on Reset Brushes to load the default brushes list, or Replace Brushes to override the active list of brushes with a new one.

Conclusion
Even though the Brush Tool is one of the more basics features of any version of Photoshop, there is always room to experiment. Try to discover something new and exciting. I hope this guide will be useful for you!