 Starting with illustrator, When you open up the illustrator you are greeted by some boxes and palettes.
 Starting with illustrator, When you open up the illustrator you are greeted by some boxes and palettes.
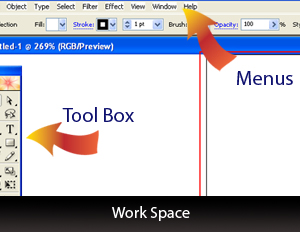
The illustrator work area consists of an illustration window, where you can lay your artwork, a tool box that consists of different tools in order to perform different tasks. Software Menus giving access to further tasks and palettes holding further tool accessibility.
You use tools in the toolbox to create, select, and manipulate objects in Illustrator. You can select a tool by clicking it or pressing the tool's keyboard shortcut. The name of the tool and its keyboard shortcut appear when you hold the pointer over the tool-this text is called the tool tip
Mostly you are already familiar with basic Ctrls , copy , paste edit and save . The menu bar contains these and further items and abilities of illustrator which you can explore.
This is where you create art The document window can be setup by accessing File> Document Setup.
Which gives you options of setting up your document. Size of the file . Unit , width , height and orientation. Explore with different options to get used to it . And if you are a photoshop user you must already be familiar with most of them. The difference here is that you can still continue to work OUTSIDE your illustration window , But when you Print the file will be taking its dimensions from the illustration window.
Palettes help you to modify your artwork you can customize them according to your requirement , Double clicking on any of the tools will pop up the relevant palette (if applicable). You can modify the placement of palettes and customize the arrangement according to your liking and requirement.
You can rearrange the work area to best suit your needs by moving, hiding, and showing palettes; zooming in or out of artwork; scrolling to a different area of the illustration window; and creating multiple windows and views. You can also change the visibility of the illustration window and menu bar using the Mode buttons at the bottom of the toolbox:
Standard Screen Mode displays artwork in a standard window, with a menu bar at the top and scroll bars on the sides.
Full Screen Mode with Menu Bar displays artwork in a full-screen window with a menu bar but with no title bar or scroll bars.
Full Screen Mode displays artwork in a full-screen window, with no title bar, menu bar, or scroll bars.
One feature that has been a long-term headache for a lot of Illustrator users is gradients. The new Gradient tool makes a world of difference with really fun, on-the-artwork controls, but that's not all-when you're satisfied with the look of your gradient, save it as a graphic style. This will preserve the angle, aspect ratio, and others elements of the gradient that aren't saved in gradient swatches.

If you've never worked with graphic styles before, you should start now. Graphic styles can save any appearance attribute (color, effects, transforms, etc.) to re-use on other objects, and the new additive graphic styles let you apply these appearances without wiping out what the object looked like originally. Let's say you're drawing a set of tree ornaments of different Fill and Stroke colors and you want to apply a graphic style that has a scribble effect and a drop shadow, without changing the Fill and Stroke. Select all of the circles you've drawn for colored ornaments, then Option-click (PC: Altclick) the style in the Graphic Styles panel (Window>Graphic Styles) to add it while retaining all of the original colors.

You can easily align a set of objects to a guide. Using the Selection tool (V), select both the guide and all of the objects, and click on the guide again. The guide is now the "key object" with which everything will line up when you use the Align functions on either the Control panel or Align panel (Window>Align). You can do the same thing with any object-the key doesn't have to be a guide.
Spring-loaded tabs in CS4 let you copy artwork from one file to another, or create symbols, brushes, swatches and graphic styles from artwork without interrupting your flow. Drag the artwork and hover over the tab and it will pop to the top so you can drop your artwork in place.
The Appearance Panel was a 2008 Hot Tip, but now there's even more. There are eyeball controls for everything, and now that you can edit virtually any appearance attribute here, you can use this one panel instead of 5 or 6 others.
Have you ever wanted to select (and edit) all the objects in your file that have a specific Effect applied? Select the object and highlight the Effect in the Appearance Panel, then choose Select Same > Appearance Attribute to pick up all other objects with the same effect. You'll see that the Appearance Panel now lets you edit items that are common for all of the selected objects.
Before erasing objects that use brushes or vector effects, select them and choose Object > Expand Appearance. Now the eraser will erase what you want without re-applying the brush or effect attributes to the path. You can do the same thing for stroked objects by choosing Object > Expand.
Change the Default font for new documents to any font you want. Open the startup profile (found inside <Mac Users: Username/Library/Application Support/Adobe/Adobe Illustrator CS4/New Document Profiles . . . PC Users: Progam Files\Adobe\Adobe Illustrator CS4\New Document Profiles>) open the Character Styles Panel and set your preferred font in the [Normal Character Style] and then save the file. The font you set will now be default for all new documents created with that startup profile.
When you want a rounded rectangle, instead of using the rounded rectangle tool, create a standard rectangle and choose Effect > Stylize > Round Corners. Later on you can change roundness at anytime, and as a bonus you can use it on any shape.
If you've received a file from somebody else and you need to print it, but you find there are five different types of black, don't fret - you can convert them all to a single black definition by using Live Color.
 This little tutorial will show you how to change appear of brushes . I have found this to be very practical when you have certain brushes which are directional ie inclined more to left or right side or above or below a line.
Here is how to change Appearance of Brushes !
Assuming that no Brush palette is open . Go to Window>Brushes (short cut F5)
Click on the small arrow on the window panel of Brushes > Open Brush Library> Other Library to browse to a new brush file or the brush set already loaded .Here is a screen shot.
Draw a line , apply the brush from the new library , you will notice that it will appear in the brushes pallette.
Double click it which will open Art Brush Options window.

click on Flip Across or Flip Along to see brush change its direction.

Brush Change Alert will open Click on apply to Stroke!

So what if the brushes are scatter brushes?.
Once a brush is applied to a path ( Drawn by hand or applied to a line or Shape ) If you have applied through an opened up a library the brush will now appear in your default brushes window ( shortcut F5) .
Double click on that brush ( Default Library ) . Which will open the appearence window .


An introduction to Gradient Mesh tool
Gradient Mesh tools are used to create a single multicolored object on which colors can flow in different directions, the color transitions achieved are smooth running from one color to another.
Once a mesh object is created you can easily change its color characteristics i.e. shade by adjusting each point of the mesh object . Meshes can be created on any of your vector , eps objects with the exception of compound paths and text objects until expanded.
You can not apply meshes to Jpeg , giff or other raster objects imported to your artwork.
In the following tutorial we will give an introduction to using of mesh tool.
Step1
Creating the Shape
Activate your smart Guides before you start Ctrl+U or view > Smart Guides
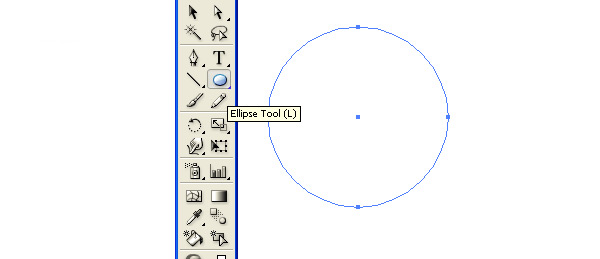
Start off by selecting the Ellipse tool(L) and Draw a perfect circle by pressing shift while you create
Step 2
Creating Mesh
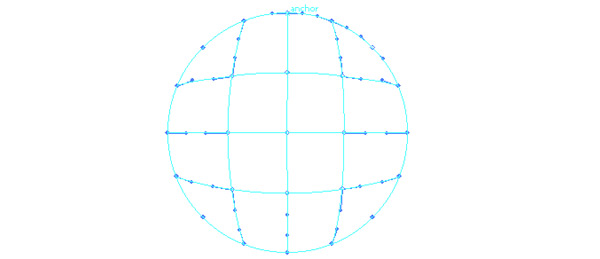
select mesh tool and click exactly in the center of the circle your smart guide will help you identify that. this is your first mesh division. Our object is to create a cartoonish face i would like to divide the the circle as a face and will shade two sides as cheeks.

Step 3
Division of the shaded areas.
similarly click and divide the right side and the left side of the circle with clicking on the line running horizontally.
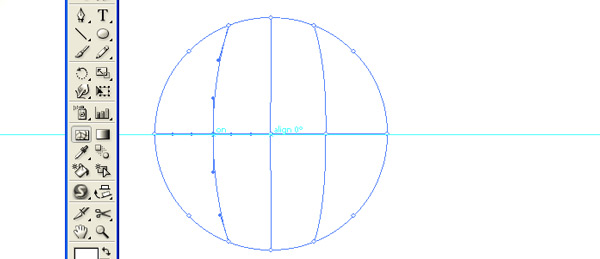
and further divide by clicking similarly on vertical line. The shape of the circle will look something like this.
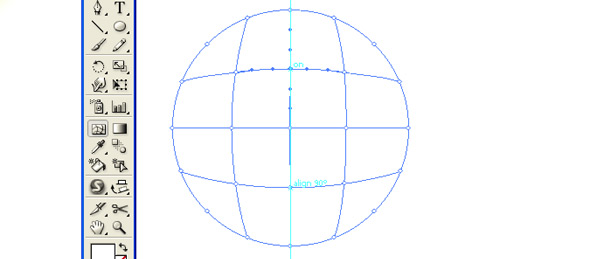
Switch your tool to direct selection tool (A) and select all the nodes on the outer anchor points of the circle which you can do by keeping shift key pressed. when selected it will look something like this
Step 4
Shading your work
open up your color palette F6 and drag to a light shade of blue you will see the effect changing in your shape
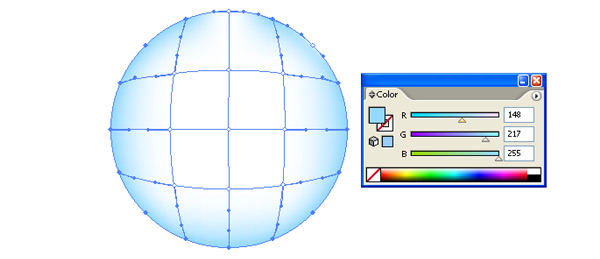
If you miss an anchor point don't worry just drag the color from your palette and drop over the missed anchor point
here is how it will look like at this point

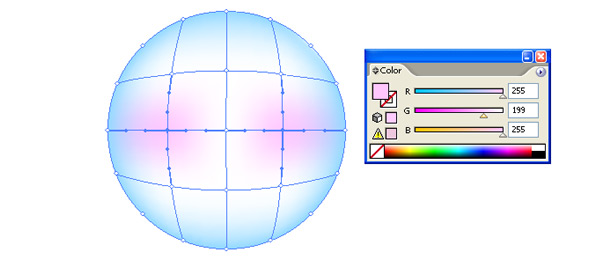
select the middle anchor points as show below and pick up a shade of pink
Step 5
Creating face elements
As the object over here is to create a face you can easily select any anchor point and using its handles change the direction of the color blending , here a chin is required so i will just play around a little with the lower anchor point in the middle. and shift it down a bit

be careful not to un-blend the perfect blending or your chin will have a cut!
Draw a few face elements.

using similar technique i will draw now eyes. Here are some steps i used to create a set of Cartoonish looking eyes
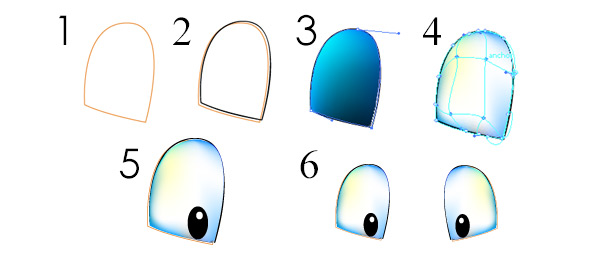
Place them over your face

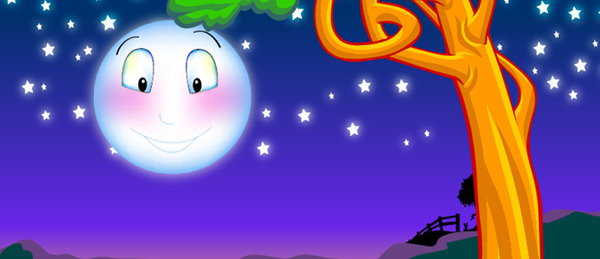
here is the finished face you can save it as a symbol and place it over any interesting background . This character was created for a children's program here is a preview of one of the screen shots of the final scene.
If you use Adobe Illustrator, then it's almost certain that you use the Pen tool when creating your paths. This comprehensive guide aims to introduce or remind you of features, shortcuts, and methods for working with what is arguably Adobe's most essential tool.
Pen tool : Click on artboard to create paths with straight segments, click and drag to create paths with Bezier curves.

Add anchor point tool : Click on a path segment to add anchor points.

Delete anchor point tool : Click on anchor point to remove from path.

Convert anchor point : Click on an anchor point and drag to create bezier handles where there were none, click on an anchor point with handles to a remove them.

Scissors : Not part of the Pen tool group, but definitely associated with it. Click on a path segment to divide into two paths.

The pen tool takes on different forms depending on what you're doing when you're using it. Each one intuitively makes you aware of the action you are about to perform.
(Caps Lock to toggle between pointer and cross hair)

 Prepared to begin path
 Whilst midway through creating or editing a path
 When mouse is pressed
 When hovered over path section; to add an anchor point to path
 When hovered over anchor point; to remove anchor point from path
 When hovered over begin point of path; to close path
 When hovered over endpoint of existing path; to continue path
 When hovered over existing anchor point
We are going to create a shape with a highlight using an opacity mask. If you would like to work through the example here's the Illustrator file.

An opacity mask allows you to mask off an area of an object and then selectively let whatever is underneath show through. The word opacity is a measure of how see-through an object is. The more opaque it is the less see-through it is. So adding a mask means that you are allowing some light through but not all. This is very useful for creating a realistic light effect. In the real world light defines a shape by the way it reflects off it. In Illustrator we can get very close to this by using opacity masks.
Think of an opacity mask like a sandwich. You first you have the base shape. In this case it is a circle with a simple gradient and stroke applied to it:

Then there is the highlight that you want to show through. In this case I've used the pathfinder panel to create this highlight shape but you use the pen tool or anything.

Then comes a layer to control the opacity. I've copied the highlight shape and filled it with a black to white gradient. When we apply the opacity mask white will show through and black will be masked so I've mimicked the light source coming from the top left.

Seen in 3D the layers stack up like this:

To make the opacity mask select both the highlight and gradient layers. call up the the Transparency Panel (Window > Transparency). In the top right hand corner is a flyout menu where you can click Create Opacity Mask.

That's all there is to it. This is just one way you can create realistic light effects in Illustrator.
 "Envelope" is the sister tool of the Mesh tool .
Envelopes are objects that distort or reshape selected objects. You can make an envelope out of an object on your artboard, or you can use a preset warp shape or a mesh grid as an envelope.
What envelopes can do?
in a defining way it SKINS your objects. Helps you modify it's surface form. Once an envelope is applied you can continue to work on your original object .
How this tool is used?
Although i don't have any specific object in mind for creation of our outcome . I start off my creating two objects

one is a pattern that i would like to apply to my work shape ie circle.
select all the elements of your SKIN right click and group.

Bring your work shape in front of the pattern right click >arrange>bring to front

ctrl+A and select all...
The Application
Go to object> Envelope Distort> Make with Top object

Here is the result

Now here is the fun part you can still edit your circle as you please select the direct selection tool (A) and adjust the anchor points to your desired result
here is what i got after playing around with anchor points
there are unlimited possibilities of what you can achieve with this tool.
Switch instantly to document size and unit preferences by using Ctrl + Alt + P.

This Ctrl is useful when you try to give a drop shadow effect to a text or an object. Generally we paste in front, and then send it back. Next time, use Ctrl + B to paste in back directly; and assign a dark color for the shadow.
While working with the text objects, you can check the spelling instantly by pressing Ctrl + I. This saves you time from opening a text editor and checking the text for spelling.

For messy artwork with lot of objects, hide unwanted objects by using Ctrl + 3. Unhide all using Ctrl + Alt + 3. This is similar to Lock/Unlock with invisibility.

Avoid accidental dragging of objects by locking them using Ctrl + 2. Unlock them all using Ctrl + Alt + 2
While creating brochures, manage the bulk of text in different blocks by using threaded text. It adjusts the text flow in all blocks/columns as you append or modify it. To achieve this, make the block shapes, select them all and go to Type > Threaded Text > Create. You can use the Area Type Tool to feed the text inside.
You can show/hide those messy text threads using Ctrl + Shift + Y.

This option is useful when you want the entire text in upper, lower, title or sentence case. Select the text and go to Type > Change Case. Assign the case you want.

This Ctrl shows the returns and spaces in a text block so that you know if you have placed multiple returns by mistake, and are not able to see due to uneven line height of the text block. Select the text body and go to Type > Show Hidden Characters (Alt + Ctrl + I)

Use Roman Hanging Punctuation and Optical Margin Alignment for better appearance of text blocks with quotes and hyphens.
For Roman hanging Punctuation; Select the text lines or block and select Roman Hanging Punctuation from the Paragraph panel menu.

Optical Margin Alignment: This option hangs the edges of letters like A and W slightly outside the text block, so that they look more balanced and aligned. To apply this, select the text and go to Type > Optical Margin Alignment.
When the objects are too small, say 2px size; it becomes annoying when you try to drag them with the selection tool; just because of the bounding box that forces you to scale or rotate the object. You can instantly hide the bounding box using Ctrl + Shift + B and toggle using the same Ctrl.

While zooming in or out for 3D objects, it takes a lot of time if you do this operation with Ctrl ++ or Ctrl���. Instead, you can use the zoom level located at the lower-left corner of the main window. Say, you want to switch from 30% to 400% in one step. Here, the zoom level will really help instead of Ctrl++ where you have to zoom 8 times to reach from 30% to 400%.

Use ���X��� to toggle between Stroke and Fill. Use Shift + X to swap the Stroke and Fill color.

Crop marks helps you identify where you want the printed work to cut or trim. To apply, select the object and go to Filter > Create > Crop Marks.

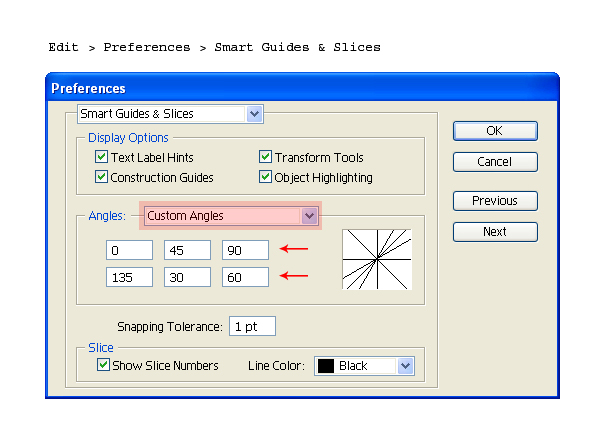
Smart Guides help you snap, align, create and edit objects relative to other objects. Use Ctrl + U to enable Smart Guides. You can customize the snapping angle of your choice using Edit > Preferences > Smart Guides & Slices. In the Custom Angle option, specify the angles of your choice. This option is revolutionary when you are working with perspective.
This is extremely helpful when you are creating a Map diagram of fairly large size. Say, we are illustrating a World Map and want to switch the view from Japan to South Africa instantly. Generally, we will drag the entire art work with hand tool until we reach our destination.
Instead, save these views with different names using View > New View option. So that, next time when you want to switch over to South Africa, just click View > South Africa. This works similar to a navigator.
We all are familiar with Rich Black and Normal Black. By default, Illustrator displays and outputs all black as rich Black. If you want to clearly differentiate Rich and Normal black for screen view and for printing, use Edit > Preferences > Appearance of Black. Select ���Display all blacks accurately��� from the dialog box. Next time, you will see Rich as Rich and Normal as Normal.

You can tween blended objects on customized paths using Replace Spine option. To apply, select the blended result along with the spine path and go to Object > Blend > Replace Spine. The blended objects will tween along the spine locus.

This option is helpful when you want the objects to be moved together, but also need the freedom to modify them separately. For this, select the objects and got to Select > Save Selection. Next time, just click on Select > Selection_name and all your desired objects will be selected.
Although, Illustrator has got Asian Language support, sometimes a US based Illustrator version might not display Arabic language correctly. For this, type the desired Arabic text in Inkscape and export the converted paths as .eps files to Illustrator.

Sometimes Corel Draw doesn���t allow us to import .AI files due to some missing plug-ins. In such case, export your artwork as .WMF (Windows Meta file) from Illustrator. Before exporting a .WMF file, enlarge your artwork to almost 1200% larger size. After successful import in Corel, again resize it back to the original size.
This is done for a reason; the small objects with fine curves are treated as distorted polygonal shapes in the output. So, it will be good if the size of the objects is fairly large while exporting. The .WMF files containing gradients are rasterized while importing in Corel; so remove the gradients while exporting. You can re-color them in Corel Draw.


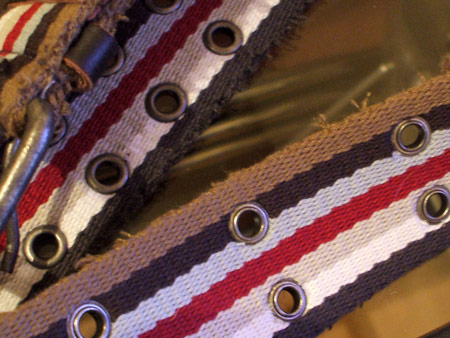
First of all, select your palette of colours. Maybe like me you have just bought a new belt with a cool combination of stripes that you can pinch the colours from, otherwise head over to ColourLovers and pick out a trendy selection.

Create blocks of your chosen colours in Illustrator to eye drop the colours from later.

Draw a long thin rectangle on the artboard and fill with your first colour swatch.


Duplicate the rectangle and butt the copy to the bottom of the original. One quick method here is to Move (Enter Key) the shape vertically using the same number as the height of the shape. Then Copy (Ctrl + C), Paste in Front (Ctrl + F) then Transform Again (CMTL/Ctrl + D) to repeat the movement. Replicate this last step over and over with each new shape until you have a block of perfectly aligned stripes.
With all your stripes selected go to Object > Envelope Distort > Make With Mesh.

Enter 4 in the Rows and Columns boxes, you may want to experiment with higher numbers to allow more complex shapes.
Use the Direct Selection Tool to select a vertical line of points from the Mesh, use the Scale Tool whilst holding Shift to enlarge the end points proportionally.
Use the Rotate Tool to add an angle to the line of points.
Repeat the step on the next set of points, this time scaling down slightly.
Onto the third line, use the Direct Selection Tool to move the points around as well as Scaling and Rotating them. Aim to generate flowing curves without any tight kinks.
Fine tune each line of points in turn with all three tools to finalise your abstract stripes.
Go ahead and experiment with more Rows and Columns in the Envelope Mesh options, here you can see the process using 6 sets of mesh points.
We'll be making a Money Back Gurantee badge for a website. In this tutorial, the aim is not only on showing you how to create the icon but you will also practice and experience few of the tools of Illustrator and learn a few operations that will be helpful to you in the future.
We will start off by creating a simple triangle using Pen Tool shortcut P , Select pen tool and while pressing shift draw a few straight lines to draw a triangle . Now we need to increase the hight of it . with Direct selection tool Shortcut A select upper most node and press shift and move it a bit upward.Untill you have a shape something like this!

Again select the selection tool (V) and select your little tirangle give it a light pink colour if you choose to have a red stamp like i have created. Select the triangle while pressing on Alt + Shift create a copy of it aligned just next to it. Something like this!

Next we will now create our own brush! how exciting is that! ... with this technique you will be able to create your own brushes. Now since your last steo was copying the triangle just hit CTRL+D which will repeat your last step , make around 8 copies of your triangle .

Now before we convert this into a brush we will expand the row of triangles. open up your pathfinder window and click on expand . Although there is not much requirement of expanding this at the moment but this step is added for your future reference in case your brush is complicated than this.Following is a screen shot of this.

now open up your brush window ShortCut F5 and create a new brush while selecting the triangle row. Here is how

And click on new file icon as you see here , this will open a dialogue box asking you what type of brush you will like to create?

Create a New pattern brush hit ok

follow the options as i have selected over here. Hit OK. Now you will draw a circle and apply this brush to it .And adjust the stroke to get what you want , notice we chose method of Hue Shift that will easily let you change the colour of your brush according to your liking . Here i have drawn a circle and dropped the brush to it and adjusted ... See here?

Press CTRL+2 to lock your selection .
Now we need to create our red ribbon , we will simply create two circles one inside another and using Align window center them togather. Like this

Once click on vertically distribute center then horizonatally distribute center. now we need to cut the inner part out! open your pathfinder window again and cut off inner circle using Subtract from shape are

drag the shape over your pink triangle ribbon and align them well in center using align tools

Now in order to place text we will use text on path tool!Start by creating a circle just sligtly bigger than the smaller circle you see here. Click anywhere on the Circle and start tying 100% Money Back or whatever you would like for your own badge.

Once you have typed on path use the window >Type > Character window to adjust the spacing in letters and placing of letters by increasing size of circle or rotating it

Once you are happy with your letters go to Type> Create Outilnes.

Create a copy of the text and reflect Select the rotate tool Short Cut R and click in the exact center of the circle which will give you a little blue indication of placing your rotating mark now press alt and move your cursor this will create a copy of the text and you will rotate it to place it exactly on the reflected position. As shown in picture below

Just need some adjustments over here you can do that manually as well

Select the rounded rectabgle tool and draw a rectangle across the circles

Adjust the stroke weight and stroke colour And write your final text across it using the text tool!

Go to Select All > Object > Expand
There you have it your very own site badge modify the text to create your own.
Get psyched up!
Create a new document, then make a 190 px wide by 290 px tall rectangle with the Rectangle Tool (M).

With your Direct Selection Tool (A), select the top left corner of the rectangle. With the point selected, the Control Panel defaults to the Anchor Point options. Press the second to the left button, converting the anchor point to a smooth point.

Repeat the previous step with the top right anchor point.

Fill the rectangle with a Linear Gradient from the Gradient Panel and change the first swatch to a pink color and the second swatch to a darker pink color.

Use the Gradient Tool to adjust the gradient by clicking and dragging from the middle of the shape to the bottom.

Copy (Ctrl + C) the shape and Paste in Front (Ctrl + F). With the new shape selected, use the Selection Tool (V) and scale the shape to half of its original size. After scaling, place the the copied shape towards the bottom of the original.

Change the first swatch in the gradient fill to a light pink and the other swatch to a slightly darker pink.

With the Star Tool, click on the artboard to bring up the Star dialog. In the dialog change Radius 1 to 50 px, Radius 2 to 25 px and the Points to 3.

With the triangle selected go Effect > Stylize > Round Corners. In the dialog change the radius to 15 px.

With the Selection Tool (V), squish the triangle horizontally to half of its original size. Next rotate the triangle 180 degrees.

Fill the triangle with a Linear Gradient, make the first swatch a dark pink from the previous shape and the second swatch make a darker pink. Adjust the gradient so the darkest part of the gradient is at the bottom of the triangle.

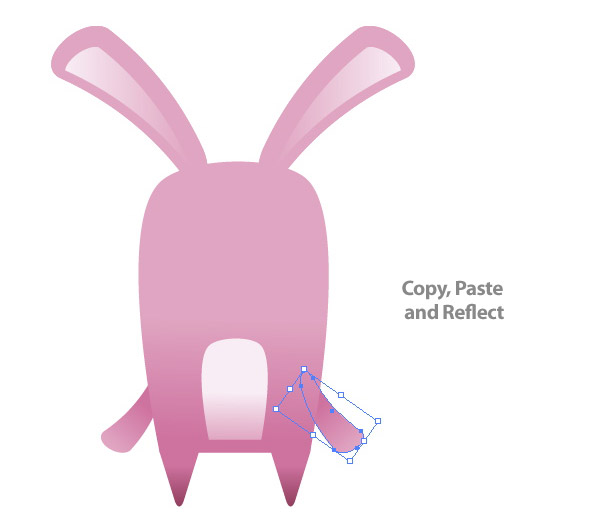
Place the triangle at the bottom of the bigger body shape creating a leg. Once placed, drag out a copy of the leg to other side. Simply hold down Alt + Shift while dragging the shape.

Create a 200 px wide by 50 px tall rectangle and round the corners at 25 px.

Go to Effect > Warp > Arch. With the Warp Options dialog open, change the Bend to 20 and the Horizontal Distortion to -49. Next, make sure to expand the effects by going to Object > Expand Appearance. If you don't do this you will get some unexpected results as the steps continue.

Rotate the shape 45 degrees to the right so the shape is vertical. Next, place the shape over the top of the body shape. Once placed, Copy (Ctrl + C) and Paste in Front (Ctrl + F) the ear shape. Reflect the shape vertically by going to Object > Transform > Reflect and choosing the Vertical option in the dialog. Once reflected, move the copied ear to the other side of the body.

Change the fill of the the ears to the first swatch pink color in the body shape.

Select the first ear and go to Object > Path > Offset to open the Offset dialog. Change the Offset to -15 px. Next, move the offset slightly down and to the left.

Change the fill of the offset to the light Linear Gradient that was used in the belly shape of the body.

Repeat the same step for the right ear shape.

Copy (Ctrl + C) and Paste (Ctrl + V) the main right ear shape. Rotate the copied shape 190 degrees and scale it down to half of its original size. Fill the shape with the original body gradient and place it behind the lower left side of the body.

Copy (Ctrl + C) and Paste in Front (Ctrl + F) the arm shape, reflect it vertically, then place it on the other side of the body.
Now that the body is done, we can start adding a face to the bunny. Start by creating an ellipse with the Ellipse Tool (L) that is 37 px by 37 px. Fill the ellipse with a Radial Gradient with the first swatch a dark pink and the second swatch the same pink as in the ears.

Create another ellipse with the previous one, but smaller, and fill it with a dark pink color. Next draw two smaller white filled ellipses within the dark pink one. Now you have an eye!

Place the eye shapes over the top left part of the body shape. Once placed, Copy (Ctrl + C) and Paste the (Ctrl + V) the eye shapes and place them on the other side of the body.

Create a triangle like before and scale it down to half of its original size. Also like the other triangle, round the corners and fill it with the same gradient. Next, place the triangle over the middle part of the body below the eyes.

With the Line Tool (\) draw a dark pink (same as the dark pink eye color) 3 pt line right below the nose, spanning the distance of the eyes.

Draw a ellipse so the bottom fourth of it is the width of the line you just drew. Next, draw a rectangle that encompasses the top half of the ellipse up to the line you drew. Select the rectangle and ellipse and press the Subtract Shape Areas button from the Pathfinder Panel. While still in the Pathfinder Panel, press the Expand button. If you own CS4, Illustrator expands it for you!

Fill the subtracted shape with the same Linear Gradient as the body gradient, but adjust it so the darker part of the gradient is at the top. Place the shape behind the line you created before.

Create a rectangle that is 38 px wide by 40 px tall. Like with the main body shape, select the bottom left anchor point with the Direct Selection Tool (A) and change the anchor to a Smooth Point. Do the same for the bottom right anchor point.

Place the tooth shape behind and below the mouth line on the left side of the nose shape. Fill the tooth with a Linear Gradient with the first swatch white and the second swatch a light gray. Adjust the gradient so the white is at the top of the tooth.

Copy (Ctrl + C) the Tooth and Paste in Front (Ctrl + F). Create an ellipse the covers the bottom two-thirds of the tooth. Select the tooth copy and the ellipse and Subtract the shapes. Once subtracted, change the color of the shape to a light gray.

Drag out a copy of the tooth shapes to the left side.

Now it is time to add some hair. With the Pen Tool draw a hair puff shape towards the top of the body. Fill the shape with the same Linear Gradient as the nose shape.

With the hair shape selected, Copy (Ctrl + C) and Paste in Back (Ctrl + B). With the copy selected, move it down slightly. Fill the copy with the same gradient as the main body shape and adjust it so the darker part of the gradient is at the top of the shape.

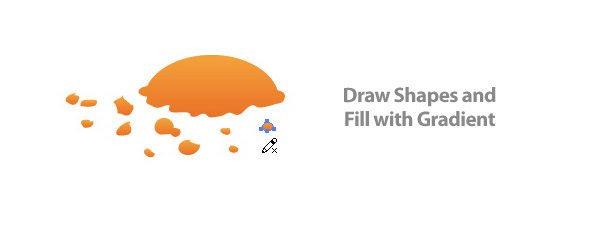
The bunny character is done, but lets have some more fun to it. Let's make it look like the bunny just devoured a carrot! Use you Pencil Tool (N) and draw twenty - twenty-five small ellipse like shapes over the teeth and mouth area of the bunny (make these shapes a bit rough). Fill the shapes with a Linear Gradient, set the first swatch to an orange color and the second to a darker orange color.

Draw an ellipse that is 45 px wide by 30 px tall. Draw another ellipse over that one that is 65 px wide by 30 px tall. Place the second ellipse so the bottom is in the center of the first one. Select both ellipses, Intersect the Shape Areas from the Pathfinder Panel, and press Expand. Next, fill the shape with the orange linear gradient you used for the small elements around the mouth, then adjust the gradient so the lighter part of the gradient is at the top of the shape.

With the Pencil Tool (N), create some little ellipse like shapes around and below the previous shape. Fill these with the same orange gradient.
Copy (Ctrl + C) the original top ellipse shape and Paste in Front (F). Scale the shape down to half of its original size, then place it towards the top of the original shape. Change the first swatch in the copied shape to a green color and the second swatch to a darker green color.

With the Pen Tool (P), draw a couple stems coming out of the carrot top. Fill these shapes with the same green gradient you just used.

Create an ellipse that is 75 px by 75 px. Fill it with a Radial Gradient with the first swatch a light brown color, the second swatch a white color, and set the ellipse to Multiply from the Transparency Panel. Next, squish the ellipse vertically to half its original size. Place the ellipse behind all the carrot top artwork as a drop shadow.

Create two more ellipses, as in the previous step, then place them behind the feet. Create another bigger ellipse, but make the brown color of the gradient lighter and place in between the feet shadows.

Create a rectangle the size of you document and fill it with a Radial Gradient. Make the first swatch white and the second swatch a light yellow color. All done!

Below is an example of a final image style we will be working towards.

Create a sketch with traditional media or in a design application like Photoshop with the Wacom Tablet. Once created, scan in the image and save it on your computer, or save your Photoshop sketch as a JPG file.

Once your rough sketch is complete, we're going to 'clean-up' the character into a finished illustration. In Illustrator, create a new document, go File > Place, find your image, and place it on your document. From the Layers panel, rename the current layer by double-clicking on layer and typing "Template". Next, press the Lock icon for the "Template" layer from the Layers panel.

Press the Create New Layer button from the Layers panel and rename it "Outline".

For the outline of the creature we are going to create two custom Art Brushes. For the first one, use the Ellipse tool (L) and create a oblong ellipse. With the Direct Selection tool (A) grab the left anchor point and drag it to left, doubling its width. Next, take off any stroke and fill it with black.

Drag the new ellipse shape into the Brushes panel and choose New Art Brush from the New Brush dialog. With the Art Brush Options dialog open, keep the default options except change the Method to Tints from the Colorization Method drop-down menu.

For the second custom brush, create a very narrow ellipse and fill it with black. Like in the previous step, create a new Art Brush and set the Colorization Method to Tints.

Now that we have our two custom brushes, we can start tracing the sketch, But before we start, there are some tips you should be aware of.
You can use the Pen tool (P) or Paintbrush tool (B) to create the paths that you will apply the custom brushes to. I prefer to use the Paintbrush tool (B) because it is quick and your selected custom brush is automatically applied to the path. If you are going to use the Paintbrush tool (B), it is a good idea to set some of the Paintbrush tool's (B) options. To do this, double-click on the Paintbrush tool (B) from the Tools panel. When the Paintbrush Tool Options dialog opens, change the Fidelity to 10. This creates a smooth line with using the Paintbrush tool (B). If you are going to use the Pen tool (P), simply selected your created path and select the desired brush from the Brushes panel.

When creating stroked paths with the custom brushes I try to stay away from creating paths with angle less then 90 degrees. As you can see in the example below, Illustrator tends to add weird remnants in angled paths. To get around this I use two different paths each with minimal anchor points. Curvier paths are usually alright.

If the brush you apply is too thick, you can adjust the Stroke Weight form the Stroke panel.

Use the different brushes we created to add line variance in the trace. I use the first brush when I want a stroke thicker at one end compared to the other.

To change the direction of the brush stroke, select your stroke and press the Brush Options button at the bottom of the Brushes panel. In the Stroke Options dialog, you can check the Flip Along or Flip Across check-box until you reach the desired direction. This works great for the first brush we created. Depending on the path, you might need to switch the direction so the thick or thin part of the stroke is on the desired side of the path.

With the Paintbrush tool (B) or Pen tool (P) start tracing your sketch making sure you are in the "Outline"layer and you are thinking about the tips in the step above. For the shapes that will be filled black, use the Pen tool (P) to create the shape. You can also use the Ellipse tool (L) or Rectangle (M) for any shapes like the eyes of the creature.

Finish outlining all the dominate lines and shapes of the sketch.

Select all the brush strokes by going Select > Object > Brushed Strokes and the go Object >Expand Appearance.

Now that we are done creating the outlines for the character we can start coloring the illustration with the Live Paint Bucket (K). First select a set of main colors for the creature. I chose pink and white. You can create these colors by mixing them in the Color panel and pressing the New Swatch button in the Swatches panel.

Select all your artwork and choose the Live Paint Bucket (K) from the Tools panel. This will automatically convert the artwork into a Live Paint Group. With the Live Paint Bucket, hover over the open spaces you want to fill. Use the arrows keys to cycle through the colors you want to fill the spaces with. When you cycle to the desired swatch, click in the desired open area to fill it.

Select the Live Paint group and go Object > Live Paint > Expand.

Now that the Live Paint Group is expanded, use the Magic Wand tool (Y), hold down the Shift Key, and select all the colors in the artwork. Once selected, Cut (Ctrl + X) the shapes. Create a new layer from the Layers panel, label it "Color", place the new layer below the "Outline" layer and Paste in Front (Ctrl + F) the colored shapes.

The creature is looking pretty good, but let's add some shadows to give it more depth. With the Pen tool (P), create shadow shapes in the "Color" layer. Fill the shadow shapes with darker colors than your original colors. Continue until you have created all the shadow shapes.

To make the colors a little more vibrant, change the fill color of the outlines in the "Outline" layer. I also used one of my custom brushes to add more detail to the eyebrows. This is a good point to touch up or add any more detail you think the illustration is lacking.

We are almost done, but to make the illustration really pop, let's put it on a colored background. Create a new layer from the Layers panel, label it "Background", and place it above the Template layer and below the "Outline" and "Color" layers.

With the Rectangle tool (M), create a rectangle, and fill it with a color.

We can also add some depth to the background by creating some bigger brush strokes. Use the Paintbrush tool (B), select a color slightly lighter than your background, set stroke weight very high (around 8 pt depending on the size of your artwork), and create a brush stroke. Create about 15 more brush stroke and mix up the Stroke Weight for some of them.

For the finishing touches create some shadows below the creature with the Paintbrush tool (B) and a darker color than your background. All done!

Below is the final image again. These techniques work really great on other illustrations and vector artwork especially for t-shirt designs.