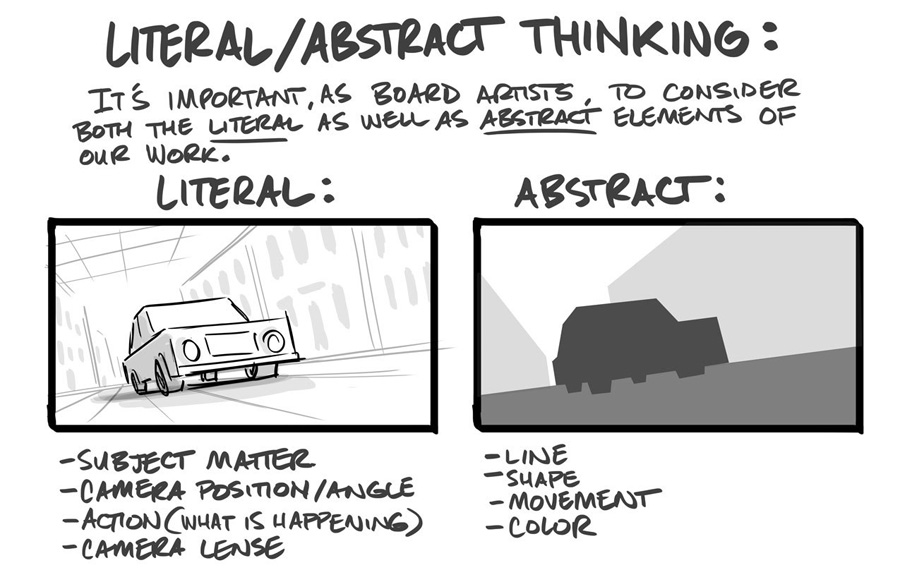
A storyboard artist is a sprinkle of fine artist, a dash of filmmaker, and a smidgen of writer all kneaded into one crispy bread loaf. A key ingredient in the mix is the filmmaker part, and for that we need to understand the visual language of film. The film language makes direct reference to a camera when discussing shots and visual storytelling. The concept of a camera is what determines the point of view of the story.
Think of yourself as being part of the story and being able to view the events through your personal camera lens. As a storyboard artist, we look through the camera lens of our minds and capture what we see in a drawn image. In the beginning, these camera and cinema concepts may seem overly technical, but once you understand the principles behind film language, it unlocks all of the excitement and challenges of a storytelling project.
Being a storyboard artist in animation is particularly challenging; you become all of the following >> cinematographer, illustrator, character designer, prop designer, backgrounds designer, actor, and editor... all rolled into one.
Week 1
ASSIGNMENT #1: The Chase
Storyboard a Chase scene, where there is a simple beginning, middle and end, and a clear goal for the characters. Try to keep the action short, tight, and to the point (50-100 panels). Pay attention to stageline and camera mechanics. Keep it very loose and rough, thumbnails only, but all the action is must be clear.
BEFORE YOU BOARD:
Think of your action and how the characters drive the story.
Identify your characters and their role in the scene.
PROTAGONIST - who is our sympathetic lead... who are we rooting for to win?
What is that character's goal?
Will the chaser win or lose?
ANTAGONIST - who is working against our sympathetic lead?
What is this character's goal and how is this want in conflict with your protagonist's want.
- For simplicity, please try to keep the primary action of the scene between two characters (or two character groups, as seen in Bullet).
- It can be a chase on horseback, skiing, cars, bikes, airplanes, or a foot chase.
- Work rough... try to make your staging clear and readable, always focus on compositional design and big shapes rather than detail, imagine what the animatic would look like, fast cutting + fast moving.
- Remember to number your drawings and if possible write out the premise of the scenes (under the panels) so I can quickly troubleshoot spots where I may get lost in the action. Very rough, simple shapes and forms, strong lines of action, lots of movement, no dialogue.
Have fun... This is the type of work Board Artist's kill for. See this classic Gumball episode's chase scene.
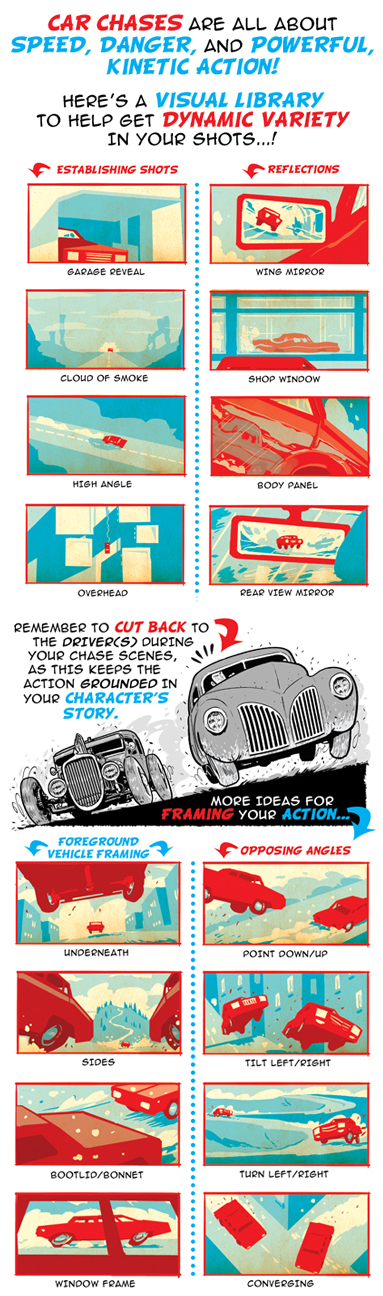
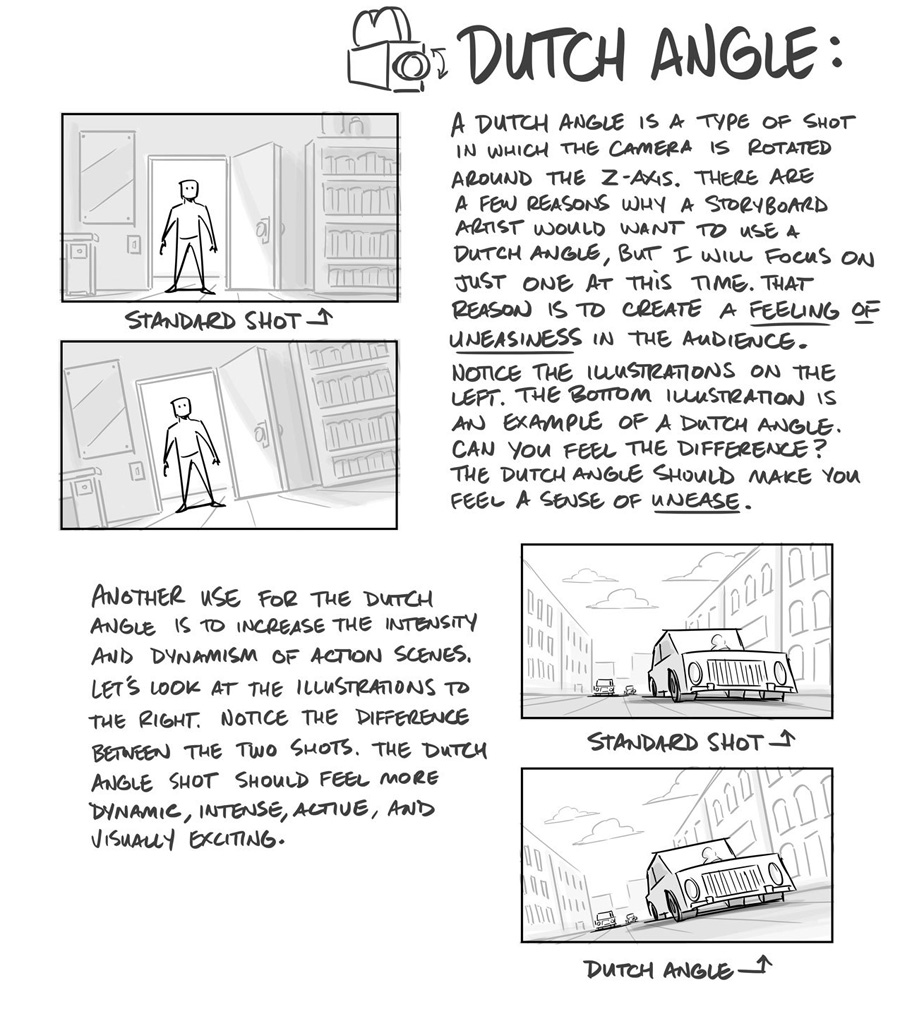
Think like a camera person:
Become very, very, very familiar with the basics, and how to use them:
Tips on illustrating camera setups and camera mechanics:
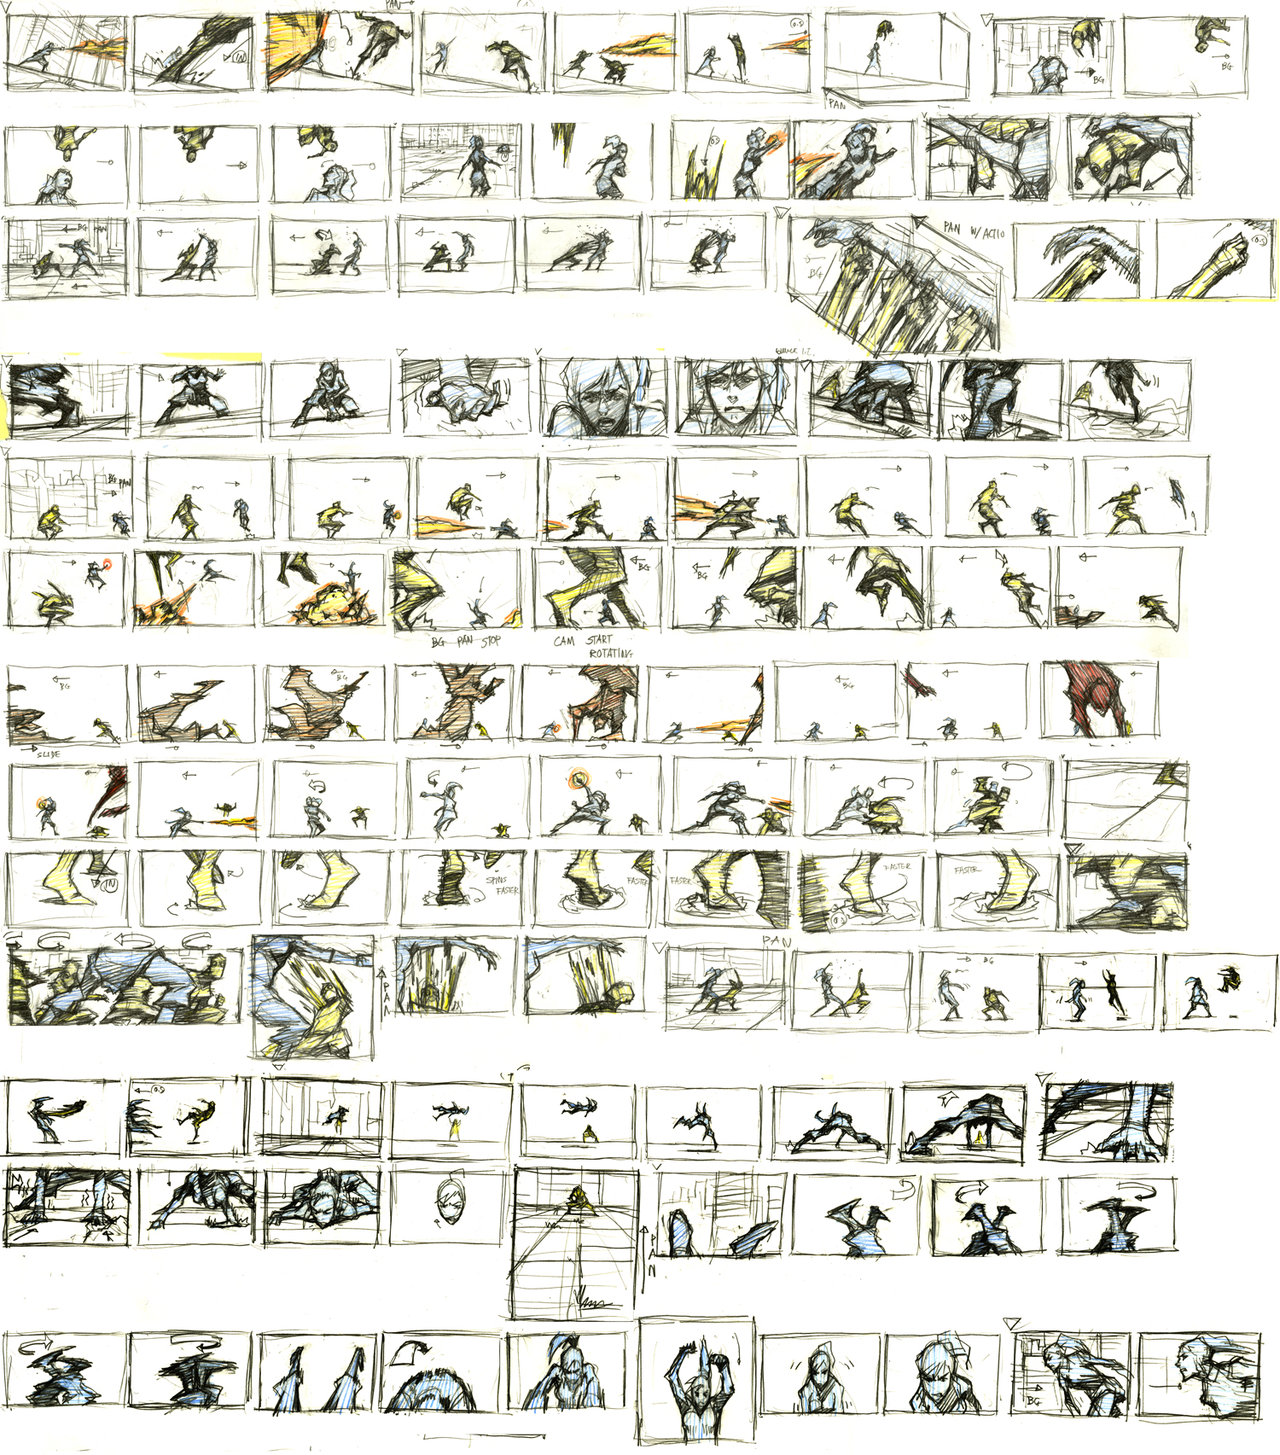
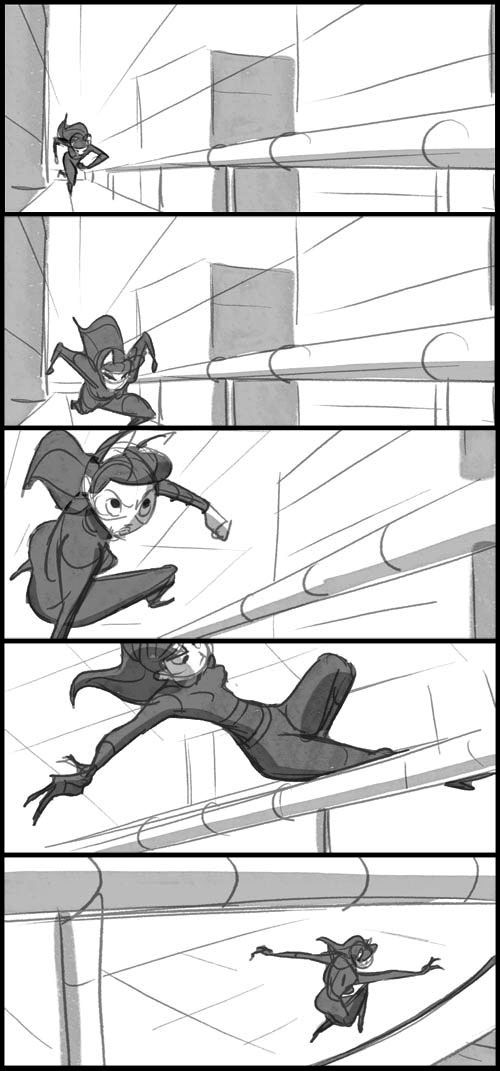
Sample Thumbnails from 'Legend of Korra':
Since you're only working with loose roughs, clear staging and silhouettes are super important.
To make the chase scene dynamic, one suggestion
would be to incorporate a few tilted angles:
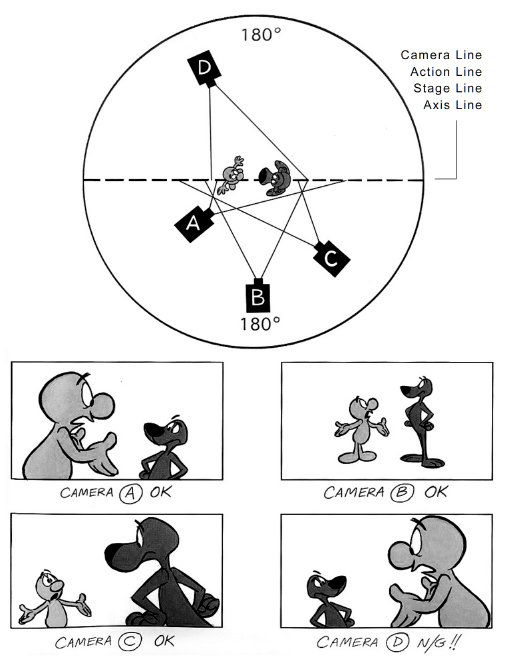
Keep the continuity for your screen direction and keep
the flow going for when you do change screen direction.
You may change the direction of the action if you transition
smoothly by moving the camera, having the character
change course, or cut away to something new or different,
then cut back to show your subject's new direction.
The genius in simplicity of James Cameron's action scenes:
Choose one of the three provided soundtracks, they are between 50 to 85 seconds long. Create a character (or characters) and a story that will fit to this piece of music.
Story Artists translate story ideas into visual sequences to convey the essence of the storyline, scene structure, character emotion, action, and humor in alignment with the overall direction of the film. With quick and gestural sketches, a mastery of human and animal anatomy, an understanding of cinematography and narrative staging, our story artists produce character-driven story sequences with strong character appeal and acting.
- YOUR SCHEDULE -
Week 1: Listen to some audio tracks and pick the one story you like best. Create simple character designs (and BG designs if needed).
Week 2: Produce very rough thumbnails, in sync with the audio track.
Week 3: Clean-up the storyboards. Refine the final posing and staging as you go with more elaborate acting, adding in any details & shading in any where you see appropriate, each week showcase your progress fro your desk for feedback.
Submit the movie once complete.
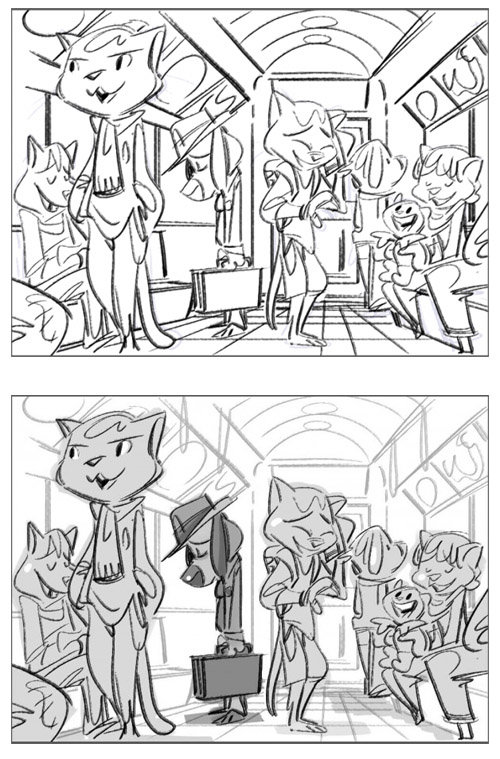
Sample of finished animatic:
The Importance of Thumbnailing
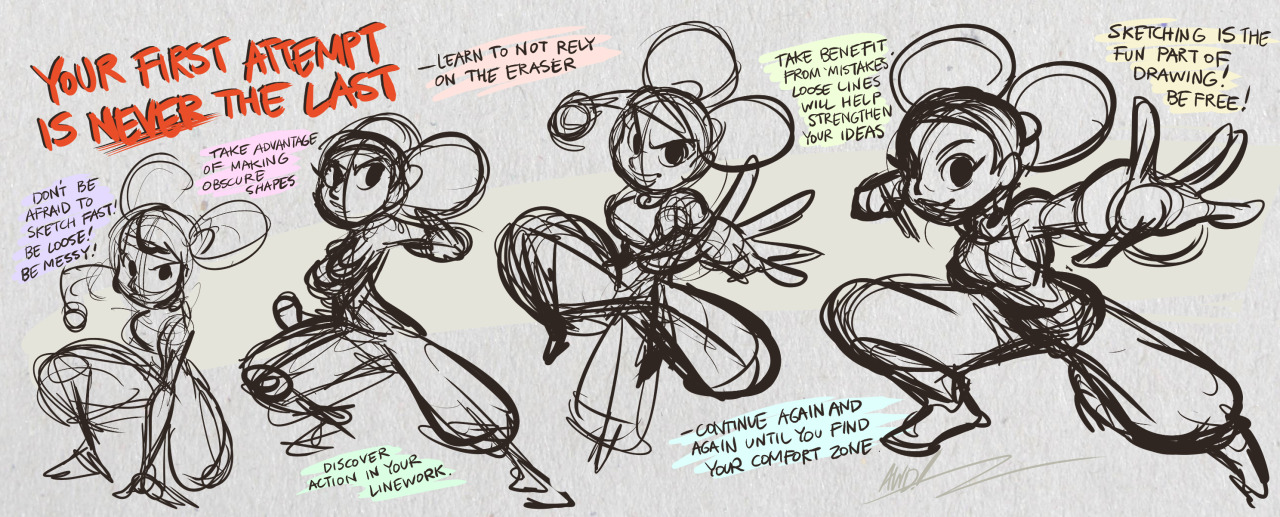
Professional/experienced storyboard artists can do about 30 clean panels per day. This is because they do a lot of play-outs and run-throughs; where they do quick and dirty roughs like this to see how the sequence works. It's actually quite normal to be able to rough out 200 panels in an 8 hour shift.
This little rough thumbnail is 27 panels, and it's not actually staged very well, but it was done in 15 minutes.
Something like this is what any storyboard artist would turn in for their thumbnail/rough pass to be reviewed by a the director or storyboard supervisor. Then they will receive notes on how to make it better. They'll redo whatever he/she asks for, and then comes the clean up pass... which is a different animal, and can take a bit longer, in the clean-up pass you refine the posing and acting, placing the characters on-style and on-model, add in more BG details, add in some secondary poses and camera information.
But still, just to get to the clean stage, it's important to be fast, to be an efficient storyboard artist you need to burn through the really rough passes... so you CAN get all your thumbnails done, get feedback and approvals, and do the revisions asked, and still have plenty of time to spend doing clean up.
The most crucial thing to keep in mind: It's more important to tell the story, than to draw a pretty picture.
Clarity in your staging and posing is key.
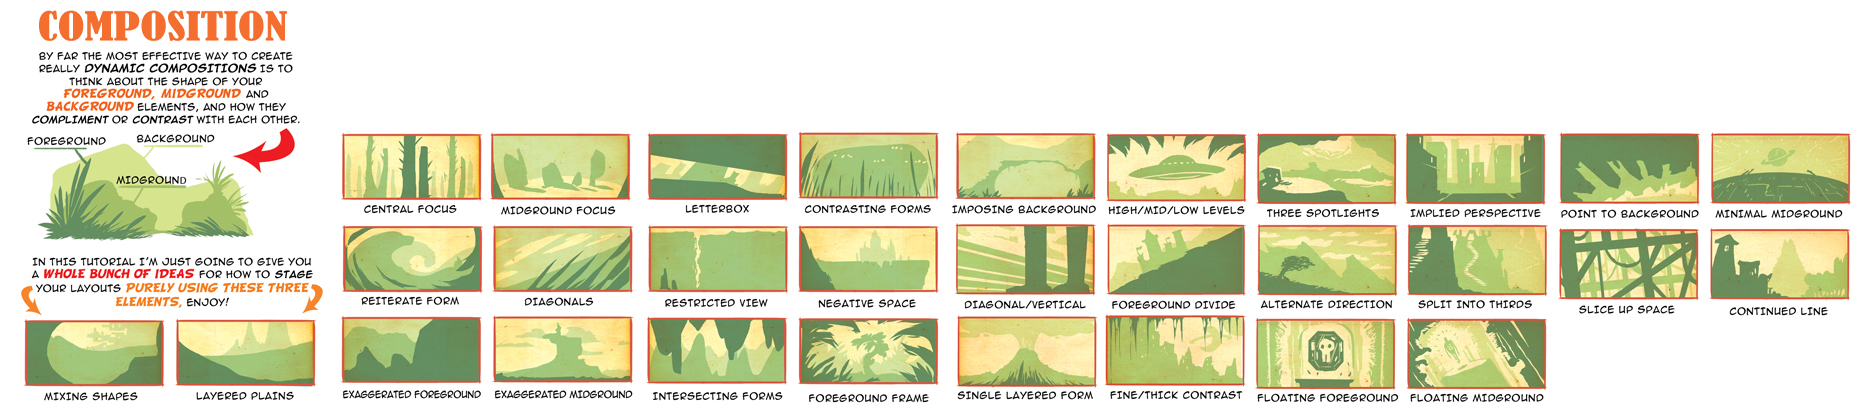
Composition in your shots can be improved with simple methods like this:
Thumbnail Tips:
Pay attention to the axis line to maintain screen continuity from shot to shot.
You may have characters actively cross over the axis line in order to have them change which side of the screen they are on.
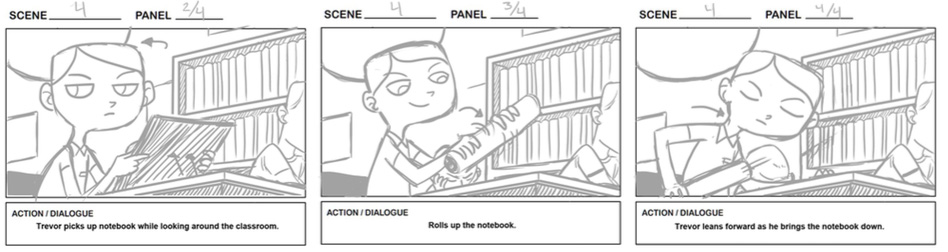
Carefully plan when to make insert shots - those close-ups that will allow the viewer to see what the characters sees, often happens in this story when they look down to read the book title. Type out the dialogue under the panels.
Seek out inspiration from the very strong and deliberate shot compositions made in these beautiful short films:
Notice the many striking compositional design elements created in these films, all created to display some stylish hand-drawn cinematography for strong visual storytelling and emotional impact.
Week 5
ASSIGNMENT #3: It's Charles, Not Charlie or The Golden Cricket
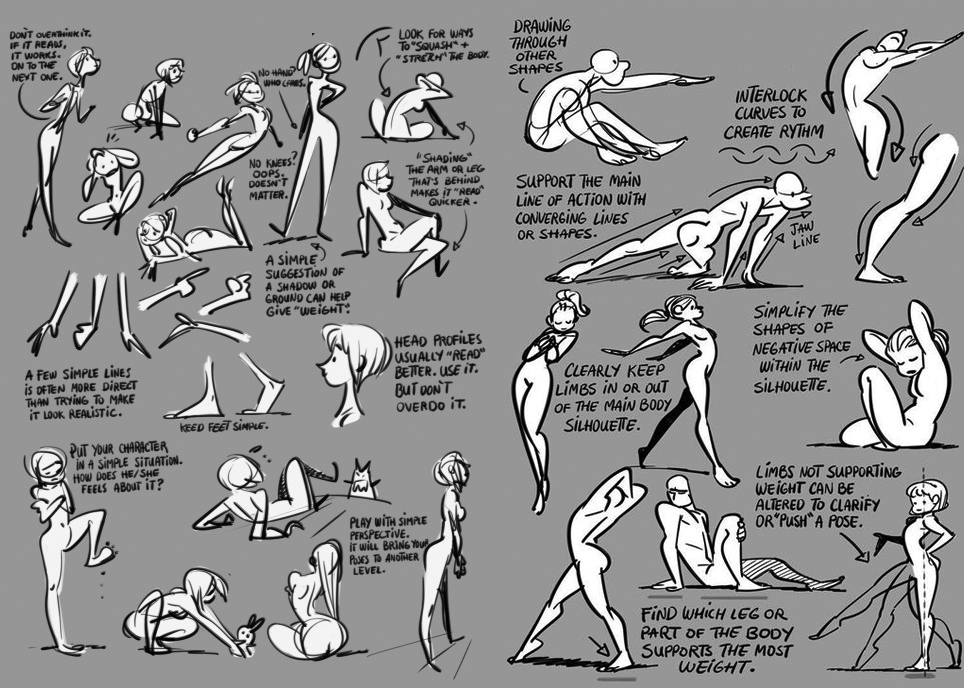
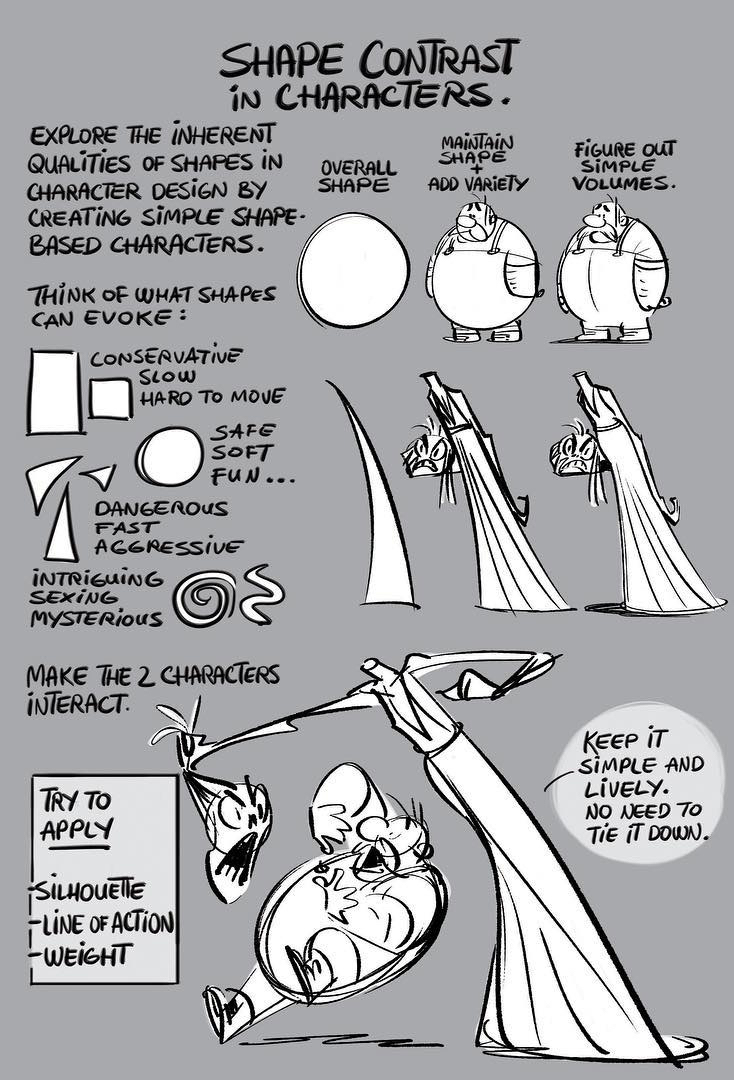
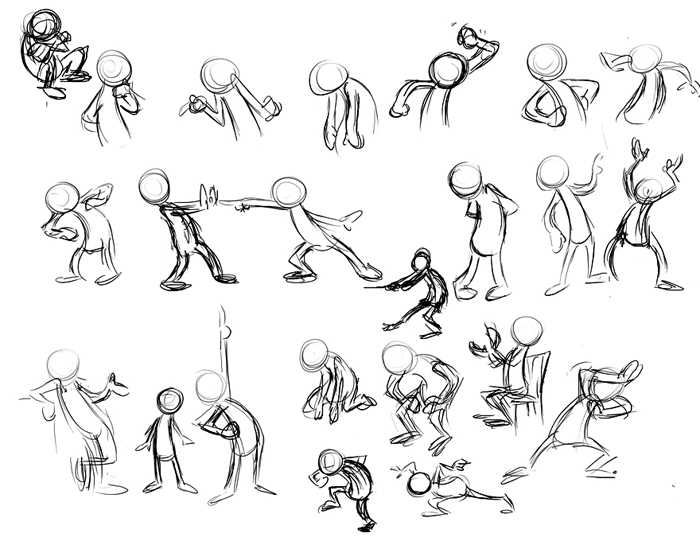
Appropriate use of negative space and line of action in your poses is important.
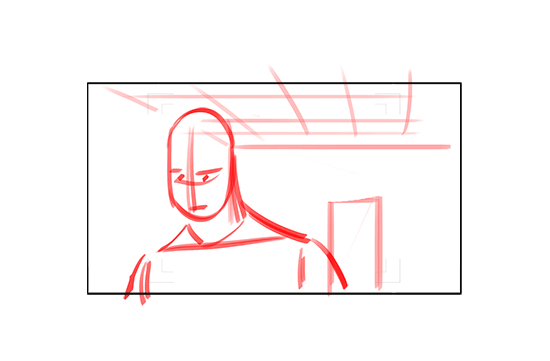
Sketches by Kitty Fung:
Tips on how to use super simple shapes & forms in your techniques on posing, acting, and body language:
Composition Guide:
Cinematography Analysis:
How a Live-Action Director Blocks a Scene:
Animation Layout and Background - Storyboard Tips:
Strong storyboarding skills to inspire you:
Thoughts on Camera Moves:
Language of Film Editing:
Thoughts on Editing Animated Films:
Quiet Cinematography:
The Purpose of Various Lenses:
Ron's Four Cs of Storyboarding
Camera Characters Composition Clarity
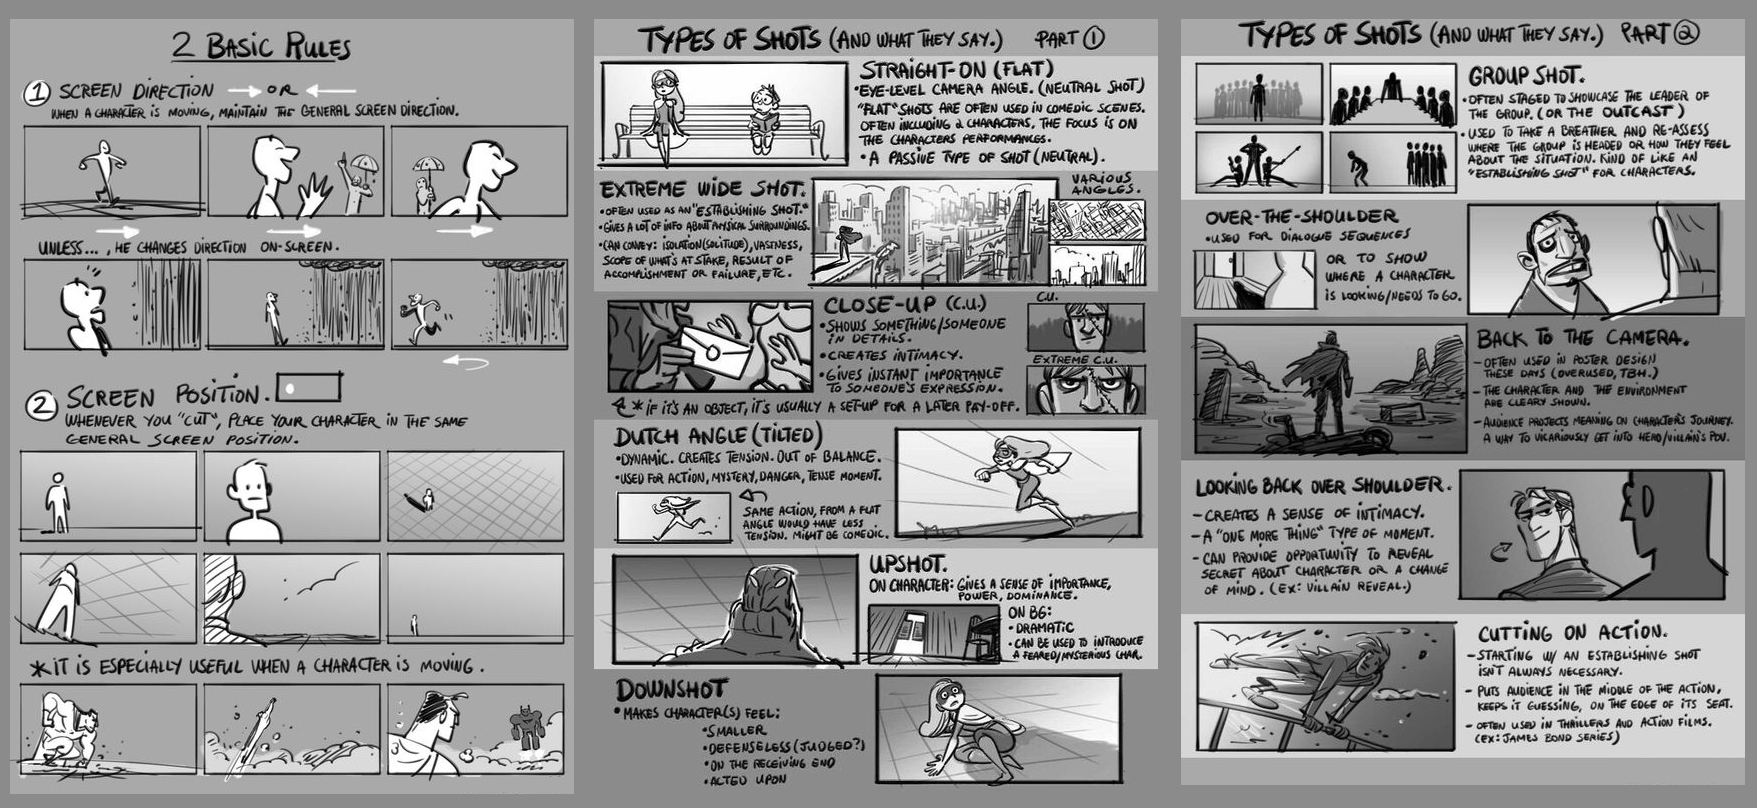
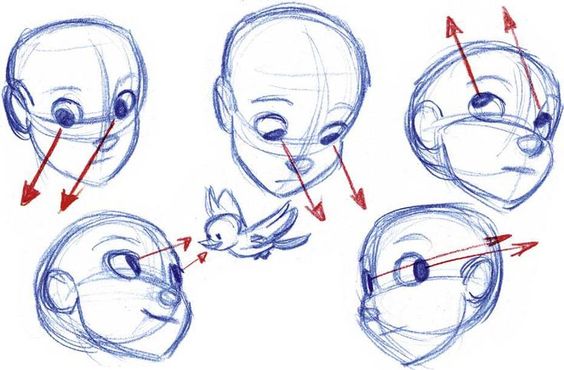
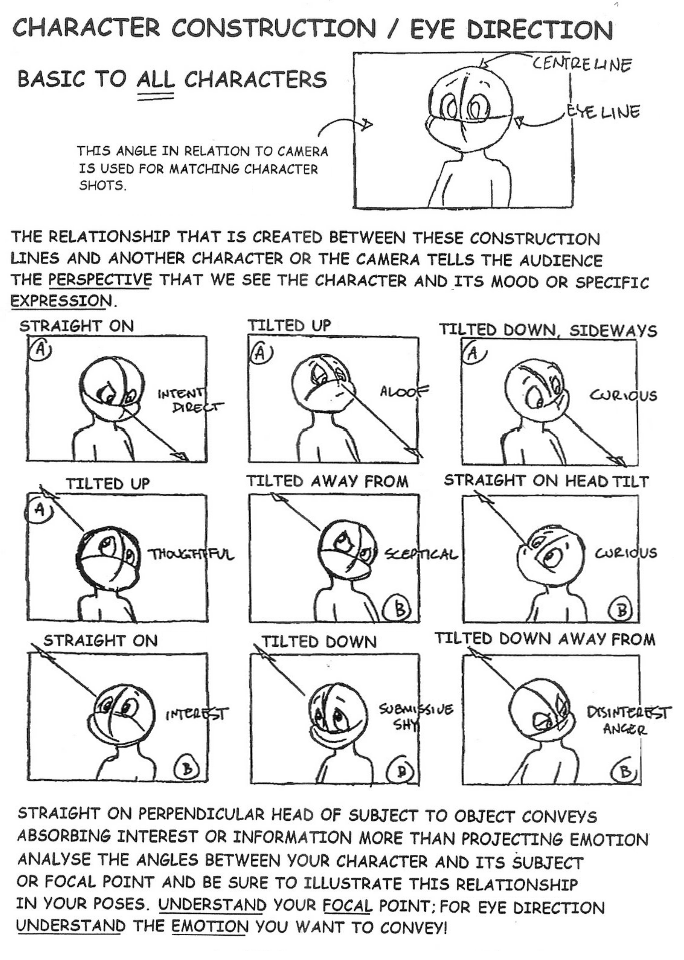
1. Camera - Defining the angle of the camera relative to the subject you're focusing on. The angle of the camera helps establish the viewer's emotional relationship with the person of interest. What type of shot to use, which point of view are your showing, and when to cut to a new angle, always let the shots tell the story; wide, medium, close-up. What is the framing of the shot, what angle to use, and how long to stay on the shot. Maintian continuity from shot to shot; be aware of your stageline, always have good reason as to when and how to move the camera through the shot.
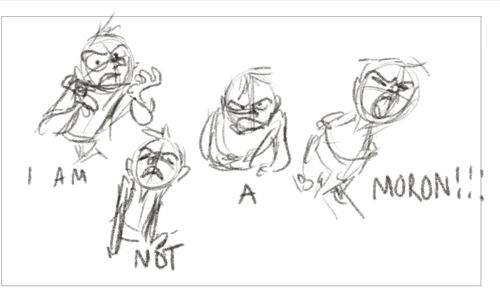
2. Characters - You should always strive to create characters that are original, entertaining, appealing, and that the audience can empathize with...meaning that they like the characters and are willing to root for them to get what they want. Then the audience will care when your characters end up in conflict. If you can illustrate what your characters are thinking, through body language, facial expressions, actions and acting, it will (hopefully) carry on right through to final animation. The storyboard artist begins the first step in convincing the audience that these animated characters actually have a brain in their heads, that they are living creatures with thoughts and feelings.
3. Composition What is the key to success in visual storytelling? A willingness to collaborate, the flexibility to evolve, and an understanding of the basic rules of cinematography. Staging the characters in each scene for maximum emotional content and clear readability of actions. In Animation it refers to the purpose of directing the audience's attention, and making it clear what is of greatest importance in a scene; what is happening, and what is about to happen. This can be done by various means, such as the pose and position of the characters and objects in the frame, the use of light and shadow, and the angle & placement of the camera. You must always be mindful of the three basic elements of cinematography: Placement of characters and objects within the frame; Movement of characters and objects within a fixed frame; Movement of the frame itself.
4. Clarity - This one is the most important aspect in the process of visualizing a script or idea, because you are working within a very small box, in both the length of your film or episode and working within your production schedule. If you're given a script/story to a short film or television episode, you may not have much say in how to develop the characters, personalities and conflicts within the plot. So you must seek out the script writer's intentions and visualize the script as best as you can. One thing is always for certain, clarity is of the utmost importance when interpreting and illustrating the story, because you don't have time to explain a lot. If you're trying to make a film about an exotic planet where all the rules are different from Earth, by the time you've acclimated the viewer to your world and explained all the rules, your film is over.
Clarity is tougher than most people realize, all professional storyboard artists and animation directors have a hard time with this. It's easy, once you've thought through your idea, to think that your drawings are explaining what's inside your head, but the viewer doesn't have the benefit of hearing your thoughts. The drawings (and eventually, the animation) have to carry it all. That's a very tough limitation, and you need to keep your "objective eye" in check, so that you can step back and look at your work fresh eyes once in a while, the way your audience will see it.
Bonus "C" - Conflict - This is the heart of all storytelling. Without conflict you don't really have a plot. In general, the bigger the conflict, the more that is at stake in your story. The bigger the odds against your characters, the more interesting the story. So if you have characters that the audience is actually rooting for, and conflict that seems almost insurmountable that they have to resolve to get what they want, then you have a great story. An engaging story is one that ends by resolving the conflict in an unexpected way that the audience doesn't see coming. Conflict is the deep inner core to all relatable stories, you must do your part to elaborate, spotlignt, and exemplify the conflict within this visual storytelling process.
Throw in the other main principles of animation filmmaking; Personality, Appeal, and Entertaiment, and you've got the primary elements that all visual stories strive to have.
Storyboard one of these two options.
80-120 panels.
Reminder:
Posing Tips:
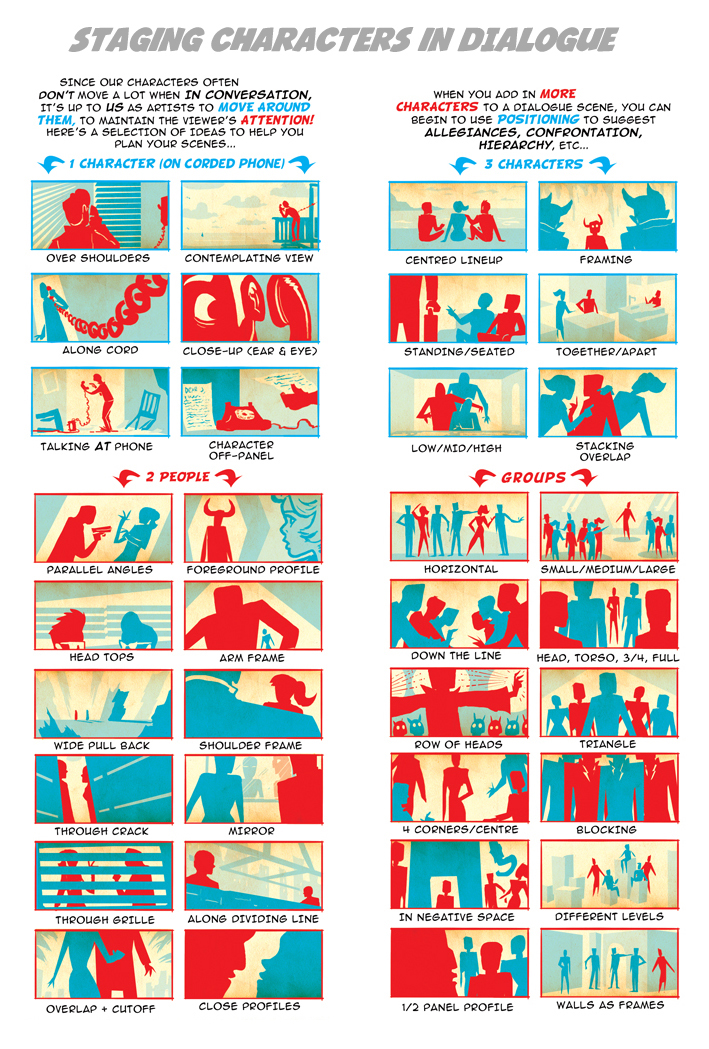
There are hundreds of ways to stage your charatcers during conversations, here's a few suggestions:
Awesome Editing Concepts to know:
Storyboarding Tutorials from the Pros:
A storyboard artist works to help determine the tone of any animation, using the main conflict as their jumping off point. In this video below you will see Kris Pearn storyboard a scene, starting with the initial idea, to the finished storyboarded sequence. Seen here, Kris talks about how he manipulates the tone by considering the camera angle, its movements, the composition, and using dynamic cuts. As a storyboard artist, he explains that he is always thinking about how the audience will feel watching it, and how he can make the audience experience empathy for the character.
Simple strategies to keep in mind:
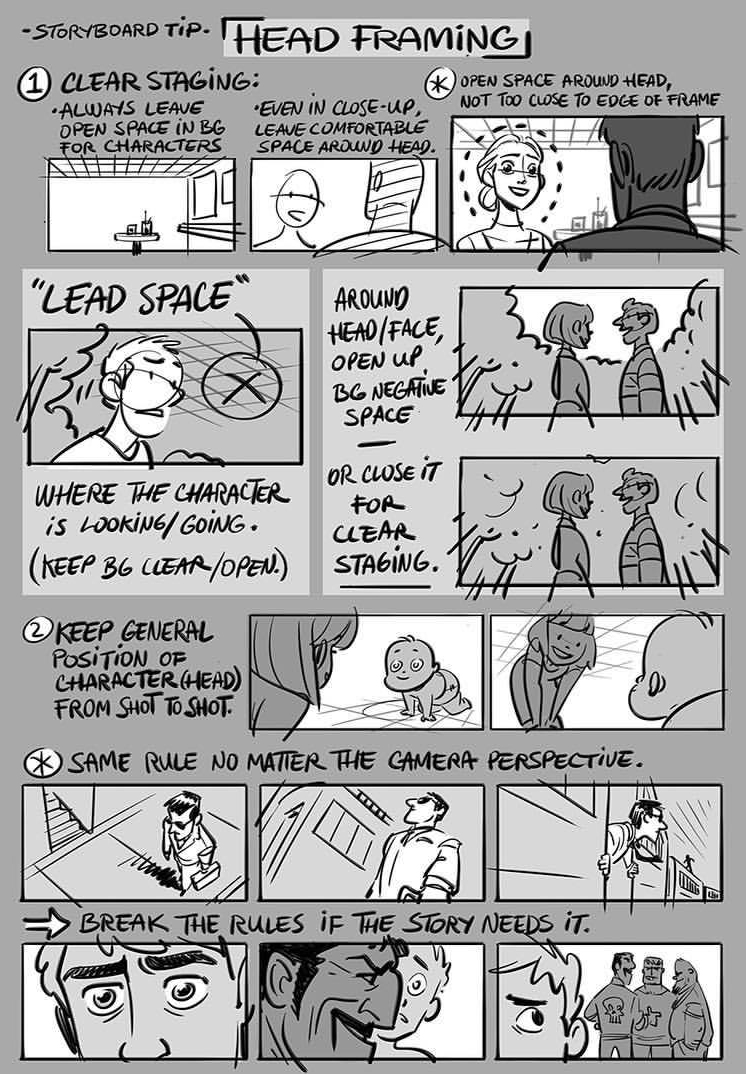
The Art of Framing:
Advice from Visual Storytellers who work on animated films:
Week 10-15
ASSIGNMENT #5: "Old Time Radio Play" Storyboard Test
Use Storyboard Pro or Adobe Animate or Photoshop/Premiere to create your storyboard/animatic.
Read Carefully:
Choose one from the 82 audio clips provided.
Import the audio into your Animatic Template file (in Flash/Animate: make certain the Audio is set to 'Stream').
The file names will give you a hint as to what the story of each clip is about.
After listening to the story a couple times, make some notes and begin by drawing up some character designs.
Build some rough and simple Thumbnails of the entire story to plan out all your shots.
As you do these you are timing out when the scenes cut and when the poses happen according to the soundtrack.
Requirements: There should be at least two camera moves (one pan and one zoom).
Once designs and thumbnails have been reviewed,
begin to refine and clean-up your poses and scene timing into the final storyboard.
This process is what will take the most amount of time.
Add shading to help separate characters/props from the background.
Add any dramatic lighting and shadows that may help with the atmosphere of the scenes.
Add any camera moves to help tell the story more clearly.
- YOUR SCHEDULE -
Week 1: Listen to some audio tracks and pick the one story you like best.
Week 2: Begin to thumbnail some ideas. Create simple character designs, a beatboard or a moodboard - submit one of them for review in class.
Week 3: Produce very rough and complete set of thumbnails, in sync with the audio track, 80-120 panels of quick-sketch/stick-figures to plan out all the main shots.
Week 4: Begin producing a more final board, using your thumbnails as reference, elaborate upon them.
Week 5: Refine the final storyboard with more elaborate posing and acting, with any additional details & shading in any way you see appropriate, each week showcase your progress for feedback.
Week 6: Finish off by reviewing and improving the animatic - submit the movie once complete.
OBJECTIVE:
Character and Background Designs are secondary, they are to be kept simple and practical. The main goal is to experiment with angles & staging techniques, and to exercise all the visual storytelling skills covered so far. "Let the shots tell the story" is always the focus and the goal. What type of shot is to be used in each scene, ask yourself which one will suit the moment better: Close shot, Medium shot, Far shot, One-shot, Two-shot, Over-the-shoulder shot, Straight-on shot, Up shot, or Down shot. Whatever it is, there must be a purpose for it. Posing, acting, timing, body language, and editing must all come together as you craft this 5 minute story reel. Think like a cameraman. Pretend this will be the visual scene planning used by animators to make this into a film.
EVALUATION:
How smoothly the shots flow together, screen geography, the overall visual clarity of the scenes and the characters within them, and what types of shots you chose to tell the story are all the primary elements that will be evaluated.
SUBMISSION:
Hand in the rough thumbnails as JPG files.
Hand in a one-page beatboard or moodboard (your choice) as JPG file.
Hand in a full animatic as an MOV or MP4 movie files.
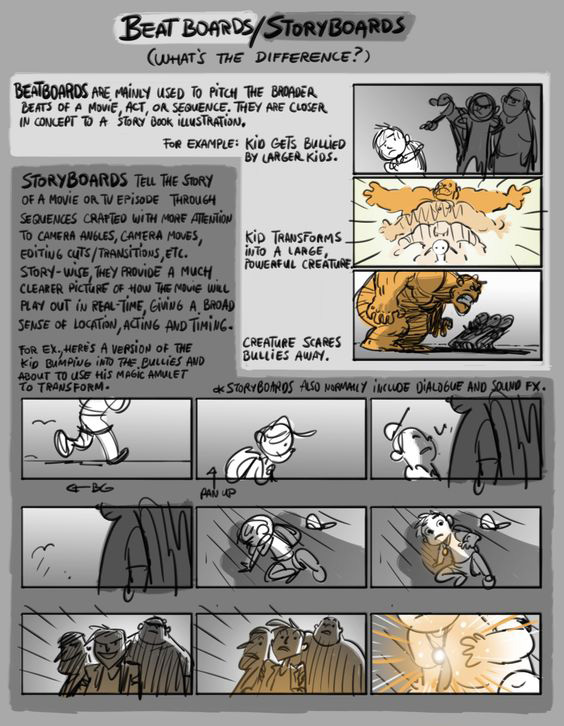
Beat Board
These rough sketches shows how you're exploring some concpets for acting and staging, helping to explore ideas about how to plan out certain shots.
Beat Boards are sketches for the storyboard artist made to help them with gags, some expressions or posing, stage direction elements, and in some cases even art direction & layout. The term "beat" comes from caputuring specifics beats or moments in the story.
Sometimes beatboards can just be sketches
to figure out the acting within a sequence:
Here's a beatboard from Bill Wray, for an episode of "The Mighty B"
Mood Boards
Also known as an idea board or theme board, a moodboard is a collage of your images that inspire you for your film. Often it can be collection of images grabbed from the internet that show off your ideas about colors, lighting, cinematography and production design.
In animated feature films, a detailed and specific moodboard is known as a 'Color Script', these can be comprised of Color Keys and Lighting Keys.
In animated feature films, Mood Boards are broad and generic visual ideas thrown together during pre-production. Color Scripts and Color Keys start to get more specific, they're made after or during the storyboards.
Examples of 'Spider-man Into The Spider-Verse' Color Keys here
For this assignment create a single color key (rough digital painting) of what a scene would look like in full color/lighting, creating a loose color concept sketch.
Samples of Finished Animatics
Helpful viewing material on film theory and visual language:
Other samples of animatics:
Story Timing + Characterization + Aesthetics
Story Timing - In visual storytelling, the timing of ideas and actions is important to the audience's understanding of the story at any point in time.
It is important that the animatic be timed to stay either slightly ahead of the audience's understanding of what's going on with the story, or slightly behind. It makes the story much more interesting than staying even with the audience. If the action is too far ahead, the audience will be confused; if the action is too far behind, the audience, will get bored; in either case, their attention will wander.
Action timed to be slightly ahead of the audience adds an element of suspense and surprise; it keeps them guessing about what will happen next. An example of this is at the beginning of Luxor Jr. Dad is on-screen, alone and still; the audience believes they are looking at a plain inanimate lamp. Unexpectedly, a ball comes rolling in from off-screen. At this point, both Dad and the audience are confused. The audience's interest is in what is to come next.
When the action is timed to be slightly behind the audience, a story point is revealed to the audience before it is known to the character. The entertainment comes in seeing the character discover what the audience already knows. Another application of this is with a dim-witted character who is always behind; the audience figures it out before he does.
Be mindful of when to cut. Each cut must be motivated to so so and must feel natural.
Characterization - The act of bringing to life and expressing the personality of a character.
This is done through the exposition of thought processes, mannerisms, actions, dialogue, timing and physical appearance. We must know the character that we place in this context, who they are, how they are specific and unique in their actions and personality. Determine what will give the action character and identification with an audience. When actions are motivated by the character's thought process, then a personality will come through, not just a generic action. Discover the right kinds of action for the character and act them out, feel them. Don't allow actions to appear routine.
Aesthetic - The composition of the shot can create an
emotional/psychological response in the audience:
> Staging: Placement of the camera
> Exaggeration: Silhouettes / Line of Action / Body Language
> Appeal: Character Design / Environment Design
> Posing: Focusing on strong, clear poses that are
both aesthetically pleasing and tell the story.
Notice how some simple shading can make the characters pop out from the background:
Keep these elements in mind when designing your shots.
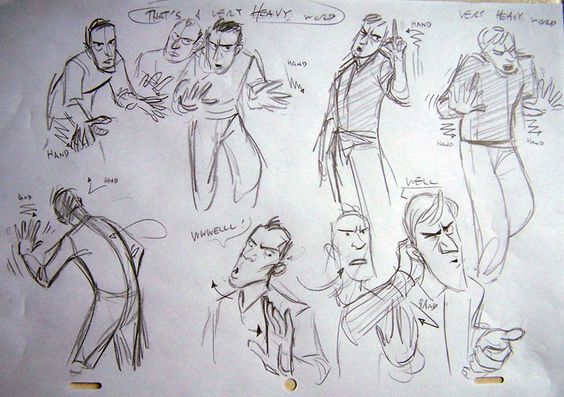
The position and posture of the characters in the scene can greatly effect the composition, in addition, it can help to place the characters within the situation, and improve the staging, making them part of their environment and the story.
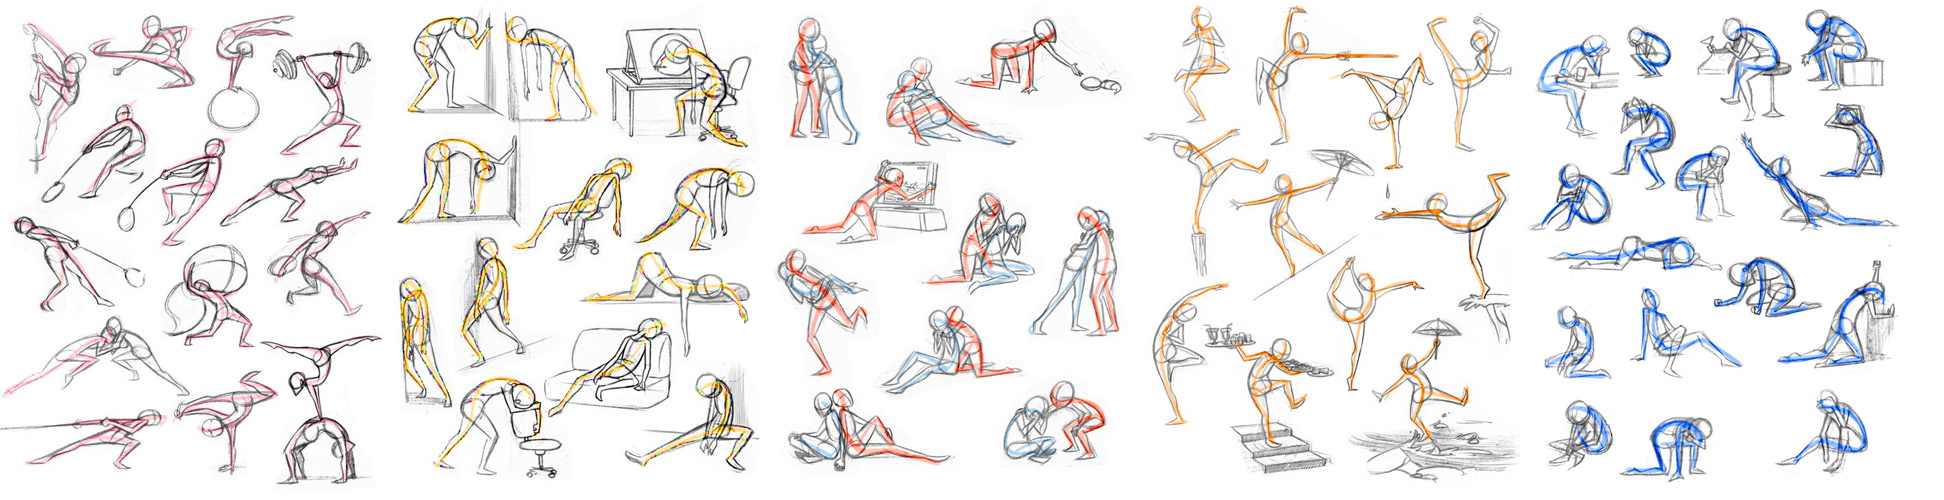
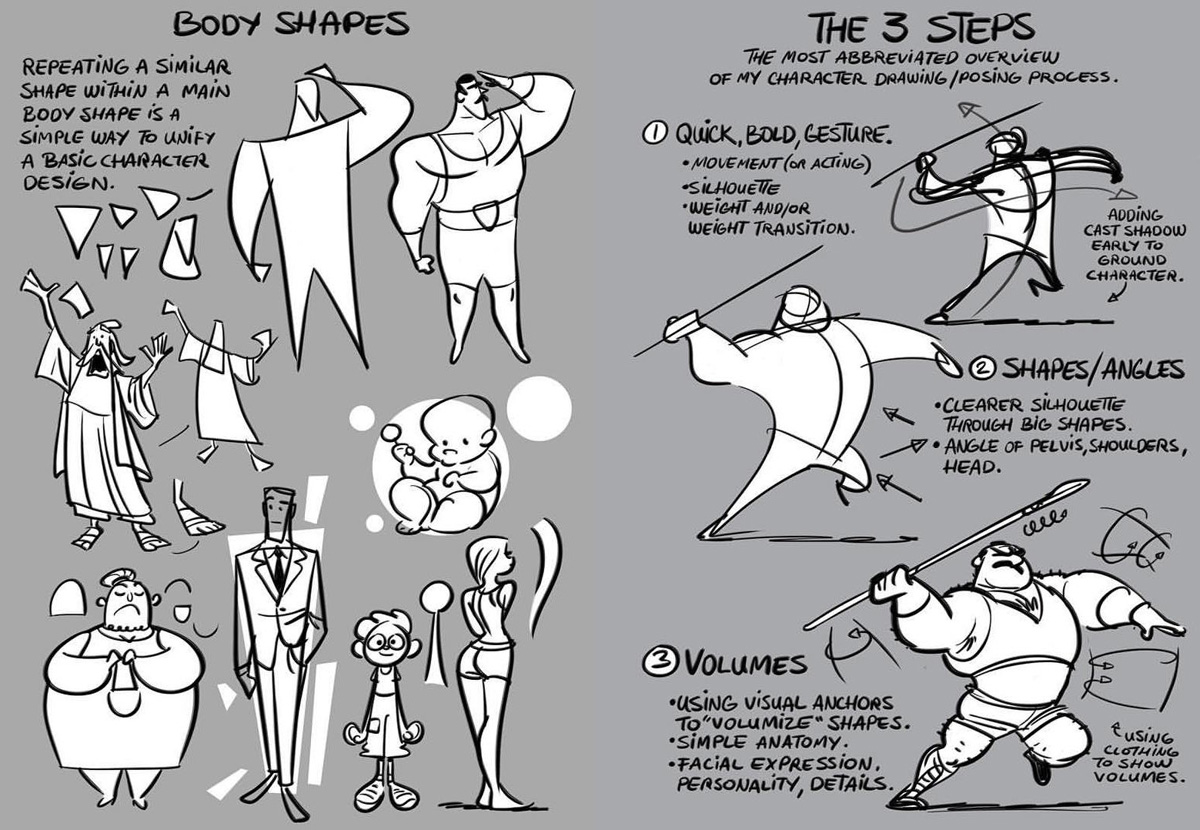
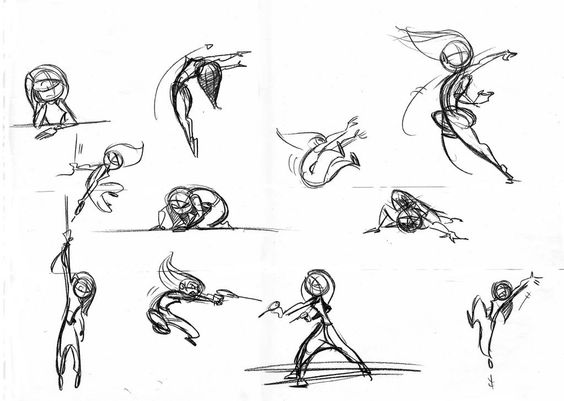
Some ways to strengthen the pose of the character is to create a nice silhouette, this is the overall shape of a pose. This shape should read clearly even if the pose were filled in black you would still be able to tell what the character is doing.
The one thing that will always bring your poses to life is the line of action, that imaginary line that dictates the expressive body language and how the body will move. You can sometimes think of it as the back bone of a character. This line should always be used in setting up a pose, as you can see in the sample below, you can even get a wide range of emotions with no faces using only their bodies. When all else fails, get up and see how your body bends and shapes when trying to act out emotions.
Read more about the importance of the Line of Action here.
Storyboard Skills to Build Up
As a new storyboard artist, there are countless stories to tell, and countless different ways production pipelines are developed in television, film, and video games, each requiring its own particular set of resources: people and outlooks, research and ethics, standards and innovations. It's in your best interest to have a strong foundation to build on. This is what I think it should look like:
1. An understanding of the role. The Story Artist supports the episode/film's vision by acting as a proxy for the director, showrunner, and screenwriter. Your responsibility is to make smart decisions on their behalf, so make sure you learn something about all of these roles. As the person first synthesizing a scene into a cinematic form, it's up to you to prove the potential of the material.
2. A sensitivity to dramatic material. Before anything, you have to be able to recognize and assess ideas. Your job is to turn these ideas into drama. You need to be able to access the emotions and concepts that animate the material. As a steward of the scene, it falls on you to find ways to take advantage of the scene's particular opportunities and challenges. At Pixar we called this 'plussing': the amplification and elevation of ideas.
3. Mastery of storytelling craft. Storytelling is construction. Acquire an intimate knowledge of story structure, dramatic theory, visual language, thematic elaboration, and the development of character. Learn frameworks, find exceptions, analyze what you like and what you hate, and build your capacity to fix scenes and stories that aren't working. I can't emphasize this enough: learn how to construct a scene, as this will be the bulk of your work. Essentially, you're learning a language, so focus on the basics. As Steven King says, "Words create sentences; sentences create paragraphs; sometimes paragraphs quicken and begin to breathe. That's the goal: to bring scenes to life and make us feel something."
4. Good collaborator-ship. Success in the role relies on moving easily between leadership and follower-ship: you need to be able to work autonomously, share ownership, and also follow direction. The Story Artist is a translator, taking ideas in one form and remaking them in another. But remember that you won't just be using drawings: be a well rounded communicator, and build your capacity for explanation, negotiation, argumentation, and proposal; be prepared to make presentations and appeals, share a vision, and thoughtfully critique. Be a great listener, a good giver of feedback, and take orders and criticisms gracefully. Be accountable to your collaborators. Stand for the right things, show up, set reasonable expectations, tell the truth, ‘yes, and', stand up for your vision, be kind, and ask questions.
5. Mastery of drawing and cinematography. Always always always storyboard with being the thought of being a camera person first and foremost. Drawing is difficult enough to master on its own, but for the story artist, it's just a tool, a language for articulating a vision, for expressing cinematic ideas clearly. Your facility in drawing will, to some extent, determine how well you can sell a scene, but no amount of technical skill can make up for flawed content choices: storytelling comes first. Cinema is an artistic medium, so in addition to drawing, go deep on film, and develop an expansive appreciation of all the arts (and culture, history, yourself); remember that you're also bringing your knowledge, experience, taste, and personal perspective to the table.
6. Take pleasure in the work. It's a privilege to tell stories with collaborators, and I hope that your experience is a good one, and that you can enjoy it for all that it's worth. If you're able to make work that you're proud of- work that represents the best of your taste, knowledge, and ability; work that makes the most of what you've got; work that you like, and that you're excited about sharing with others; work that gets to the heart of what's important to you in life - then you're probably doing a few things right.
Tips for Making a Storyboard Portfolio:
The two main skill sets in becoming a storyboard artist are Draftsmanship and Cinematography.
Here's vital information to have as you enter the field of
Storyboarding for Televison Animation: Deadlines & Timelines
Getting your first job as an artist or
animator can be intimidating, here is
some information to keep in mind as you
enter the industry and begin life... Inside The Studio
INSTRUCTIONS:
Create a Beatboard, then a rough Thumbnail board, and then a full Storyboard using the provided script and designs.
200-260 panels.
OBJECTIVES:
This assignment comes in three parts; first comes the Beatboard, where you'll illustrate some very rough key moments in the story; parts you feel need to be worked out before you start actually storyboarding. Beatboards can be used to figure out the layout of the set and important points in the story or in the acting.
The second part is to Thumbnail the whole story, caputuring basic stick-figure posing and staging for all your shots. These are very loose and rough, nothing specific, very simple, this is just to figure out the framing and camera angles. Draw a floor plan so you can figure out the geography of your set and where your characters are going to be at all times. Thumbnails are be used to plot out the acting, and action, and staging in its simplest forms:
Do not draw actual stick figure drawings for your thumbnail poses, add some volume to it:
The third part is the Storyboarding. For these boards you'll need to do a lot more posing than usual. Think about lots of reverse, shots, reaction shots, insert shots, focusing on changes from pose to pose and expression to expression. You need to show the characters thinking and show the change in their thought process. The key is to really show what the characters are feeling at any given moment.
Think about A, B, C poses in most of your shots:
- YOUR SCHEDULE - Week 1: Thumbnails Week 2-4: Full Storyboard
Storyboard this short story using the provided script and designs, you will need to design any additional props that the characters handle.
80-120 panels.
Do a very light grey thumbnail pass in your Storyboard panels, make these very rough drawings to figure out the posing and staging of each shot. Explore the postures and body language in the same fast and simple way you do gesture drawings.
Storyboard Artist, Emma Coats wrote this:
Here's a mix of things learned from directors & coworkers at Pixar,
listening to writers & directors talk about their craft,
and via trial and error in the making of my own films.
#1: You admire a character for trying more than for their successes.
#2: You gotta keep in mind what’s interesting to you as an audience, not what’s fun to do as a writer. They can be very different.
#3: Trying for theme is important, but you won’t see what the story is actually about til you’re at the end of it. Now rewrite.
#4: Once upon a time there was ___. Every day, ___. One day ___. Because of that, ___. Because of that, ___. Until finally ___.
#5: Simplify. Focus. Combine characters. Hop over detours. You’ll feel like you’re losing valuable stuff but it sets you free.
#6: What is your character good at, comfortable with? Throw the polar opposite at them. Challenge them. How do they deal?
#7: Come up with your ending before you figure out your middle. Seriously. Endings are hard, get yours working up front.
#8: Finish your story, let go even if it’s not perfect. In an ideal world you have both, but move on. Do better next time.
#9: When you’re stuck, make a list of what WOULDN’T happen next. Lots of times the material to get you unstuck will show up.
#10: Pull apart the stories you like. What you like in them is a part of you; you’ve got to recognize it before you can use it.
#11: Putting it on paper lets you start fixing it. If it stays in your head, a perfect idea, you’ll never share it with anyone.
#12: Discount the 1st thing that comes to mind. And the 2nd, 3rd, 4th, 5th – get the obvious out of the way. Surprise yourself.
#13: Give your characters opinions. Passive/malleable might seem likable to you as you write, but it’s poison to the audience.
#14: Why must you tell THIS story? What’s the belief burning within you that your story feeds off of? That’s the heart of it.
#15: If you were your character, in this situation, how would you feel? Honesty lends credibility to unbelievable situations.
#16: What are the stakes? Give us reason to root for the character. What happens if they don’t succeed? Stack the odds against.
#17: No work is ever wasted. If it’s not working, let go and move on - it’ll come back around to be useful later.
#18: You have to know yourself: the difference between doing your best & fussing. Story is testing, not refining.
#19: Coincidences to get characters into trouble are great; coincidences to get them out of it are cheating.
#20: Exercise: take the building blocks of a movie you dislike. How d'you rearrange them into what you DO like?
#21: You gotta identify with your situation/characters, can’t just write ‘cool’. What would make YOU act that way?
#22: What’s the essence of your story? Most economical telling of it? If you know that, you can build out from there.